How to Change Account Type in Windows 11?
What are the Different Methods to Change the Account type in WIndows 11 pc?
Windows 11 allows users to create different account types, such as Standard and Administrator accounts, each with specific permissions. Changing an account type can help you manage access levels, enhancing security or providing administrative privileges where needed. This tutorial provides all the methods available to change the account type in Windows 11, so you can easily switch between Standard and Administrator accounts.
Check Out: Change Pin For Your Account In Windows 11
There are two main account types in Windows 11:
- Administrator Account: Grants full access to make system wide changes, install applications, and manage other accounts.
- Standard Account: Provides limited permissions, suitable for everyday tasks but restricts access to critical system settings.
Changing an account type allows you to adjust user permissions according to their needs, maintaining a secure and manageable environment on your device.
Method 1: Using the Settings App
The Settings app provides the simplest way to change an account type. Here’s how:
- Open Settings by pressing Winkey + I.
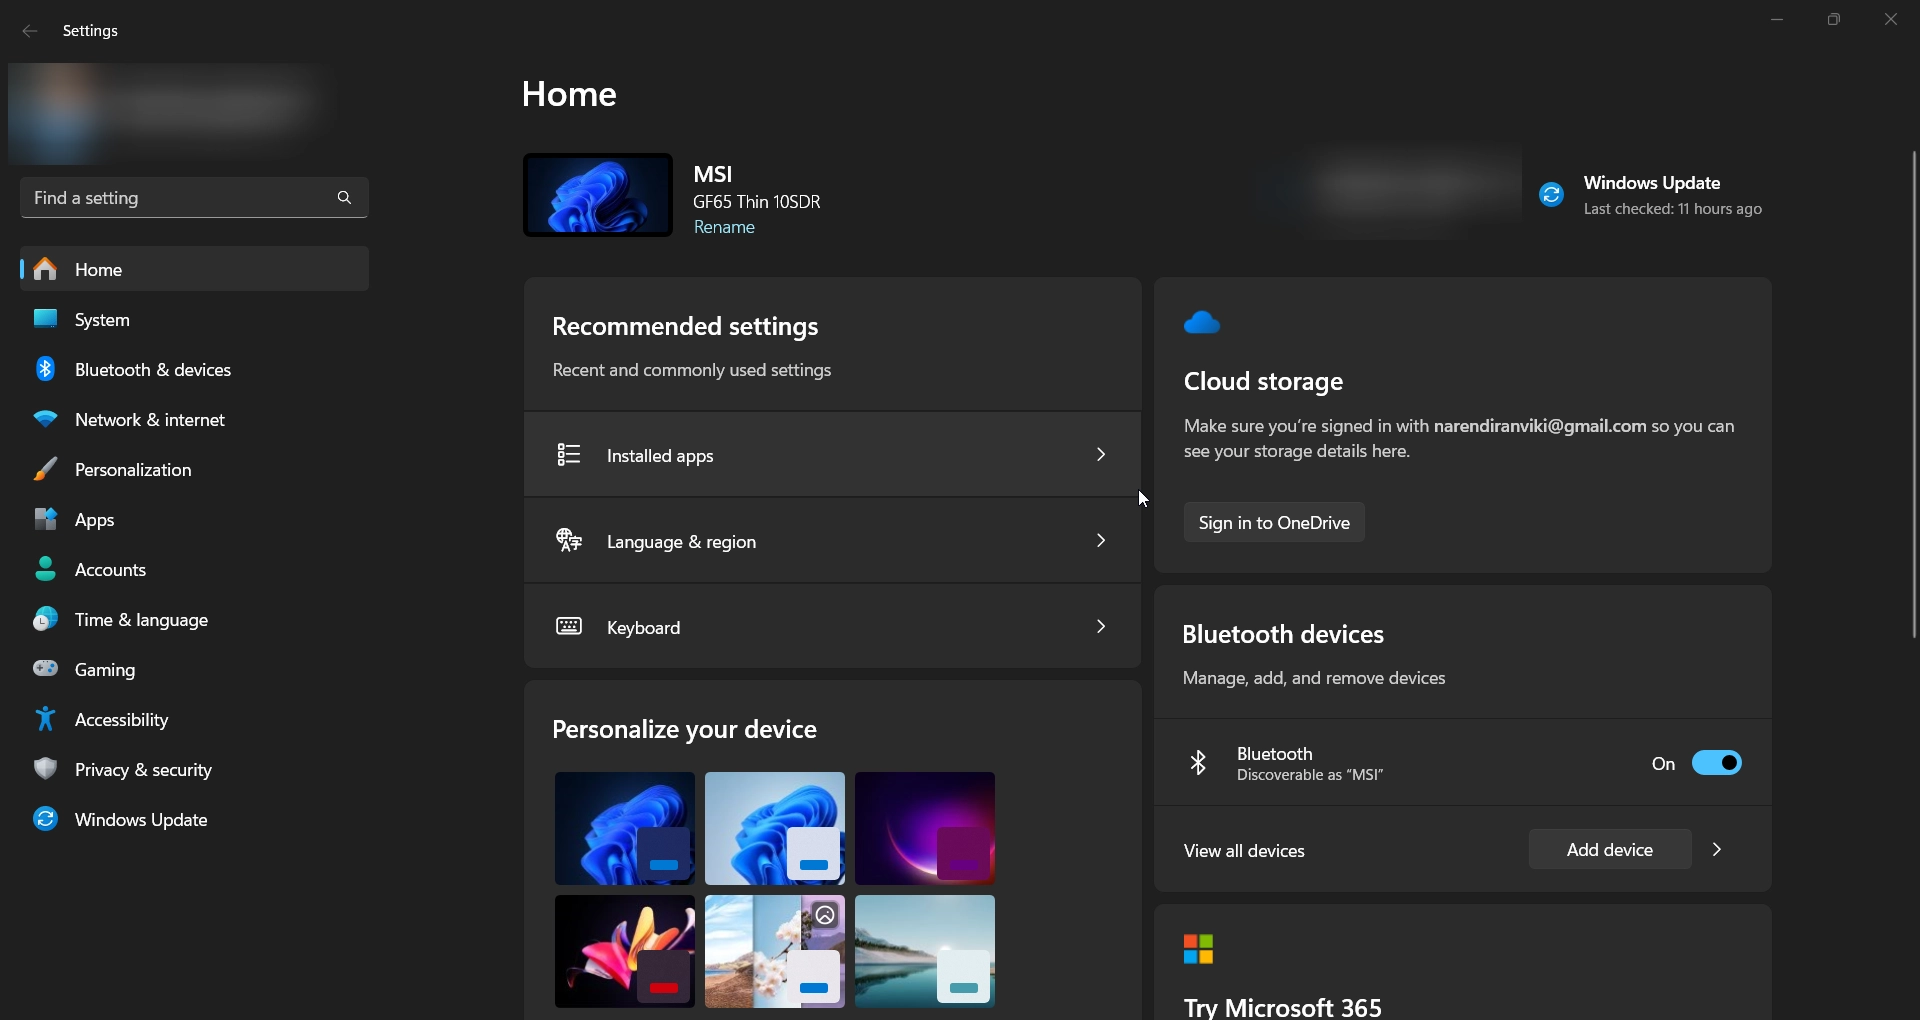
- Go to Accounts in the left pane.
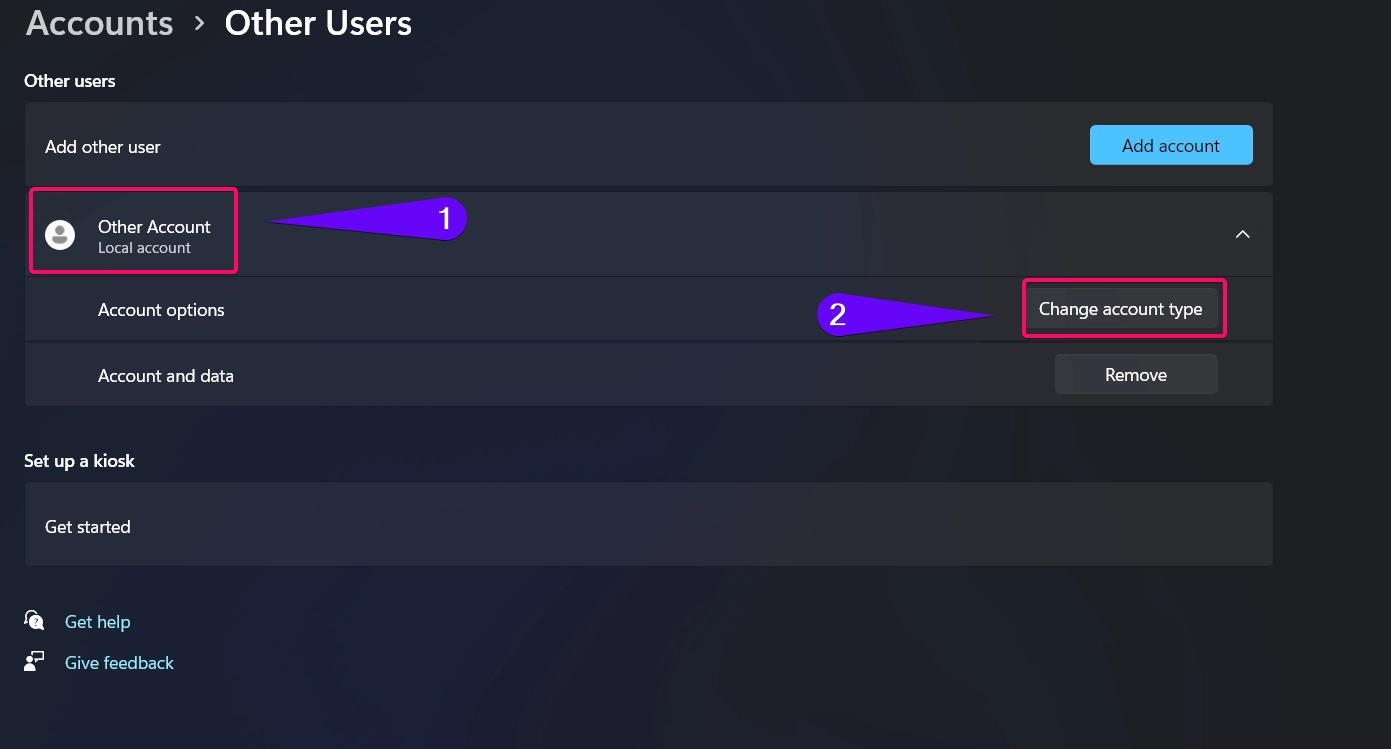
- Select Other users.
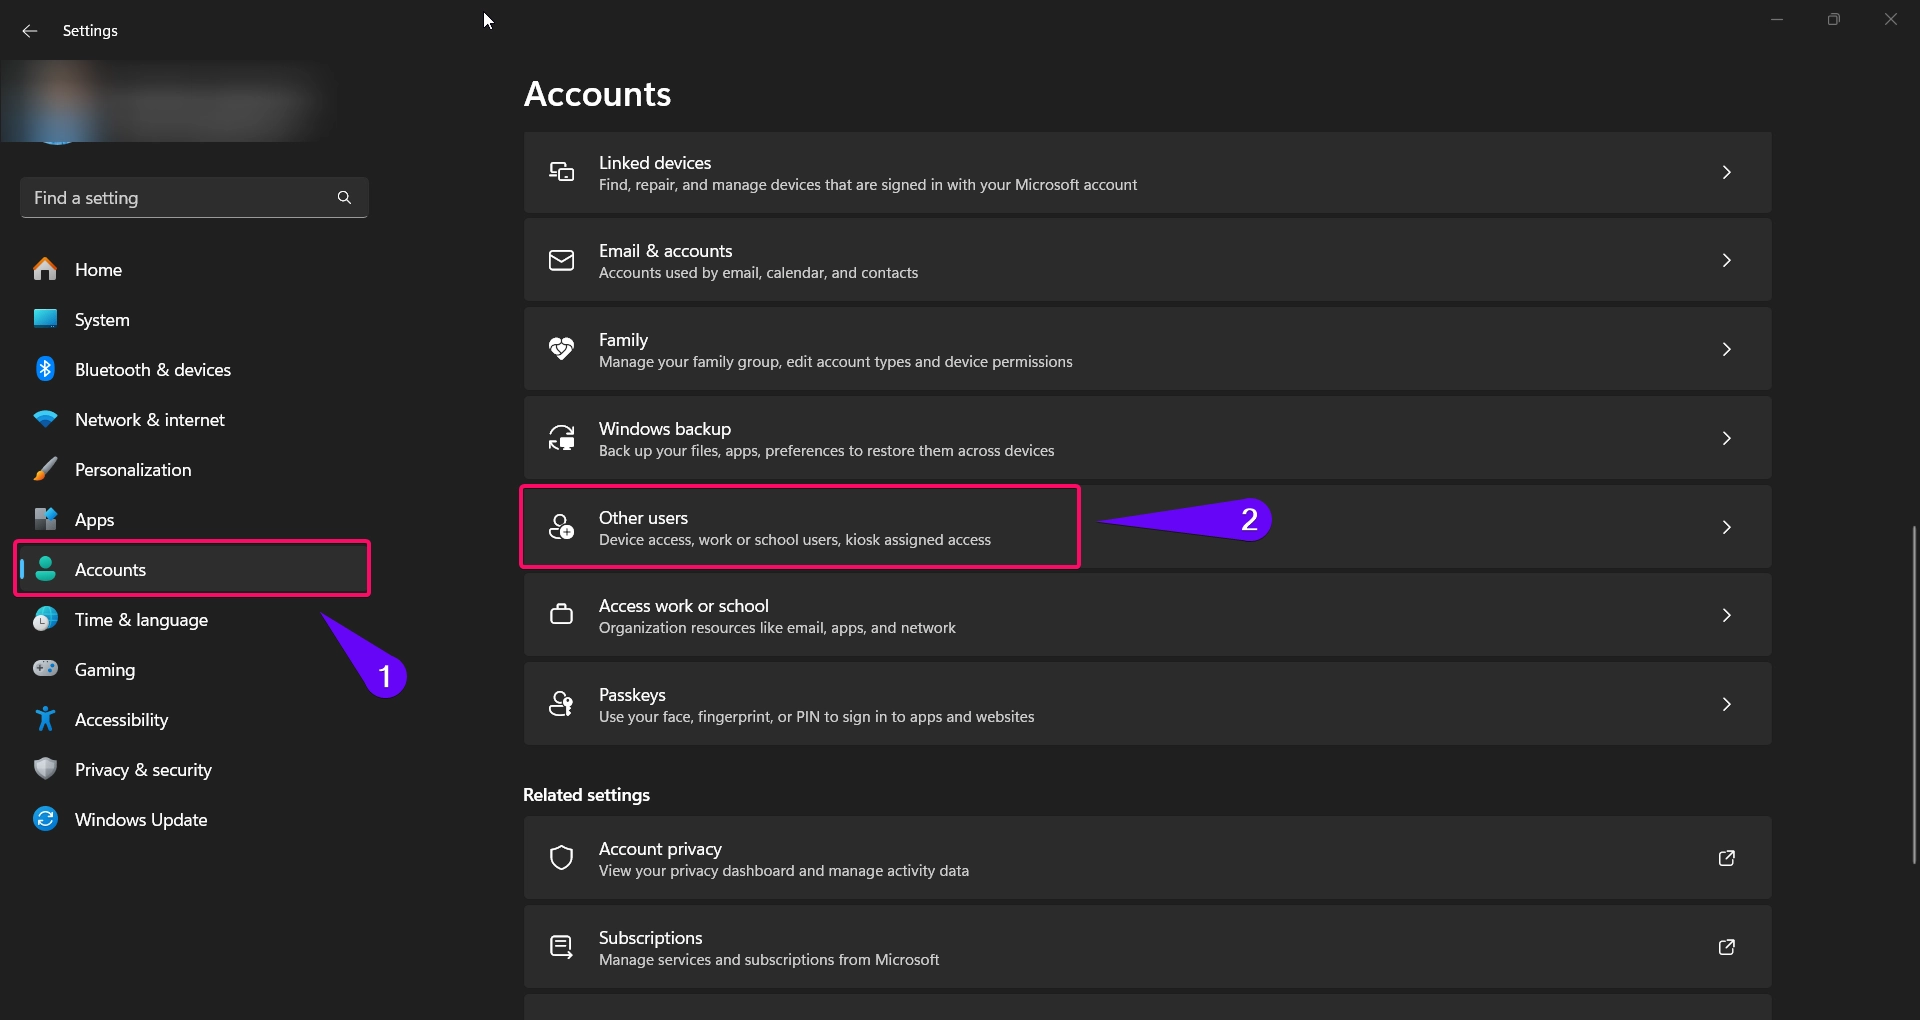
- Under Other users, choose the account you want to change, then click Change account type.
- In the Account type dropdown, select either Administrator or Standard user.
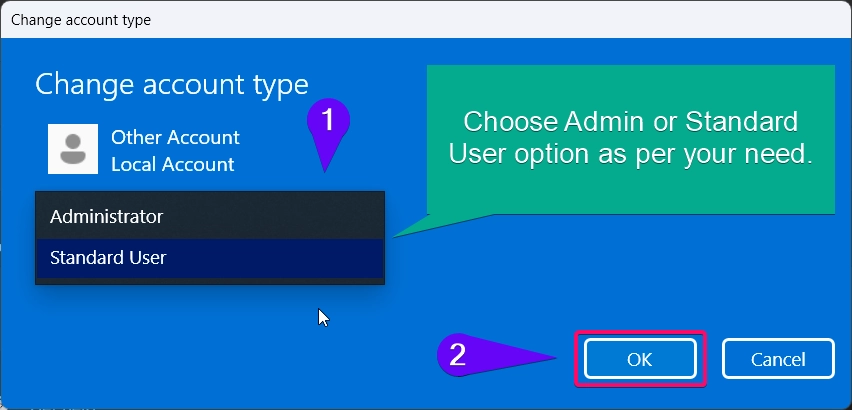
- Click OK to save the changes.
This method is user-friendly and ideal for quick access to account type options.
Method 2: Using Control Panel
For those who prefer using the Control Panel, this method provides another easy way to change the account type:
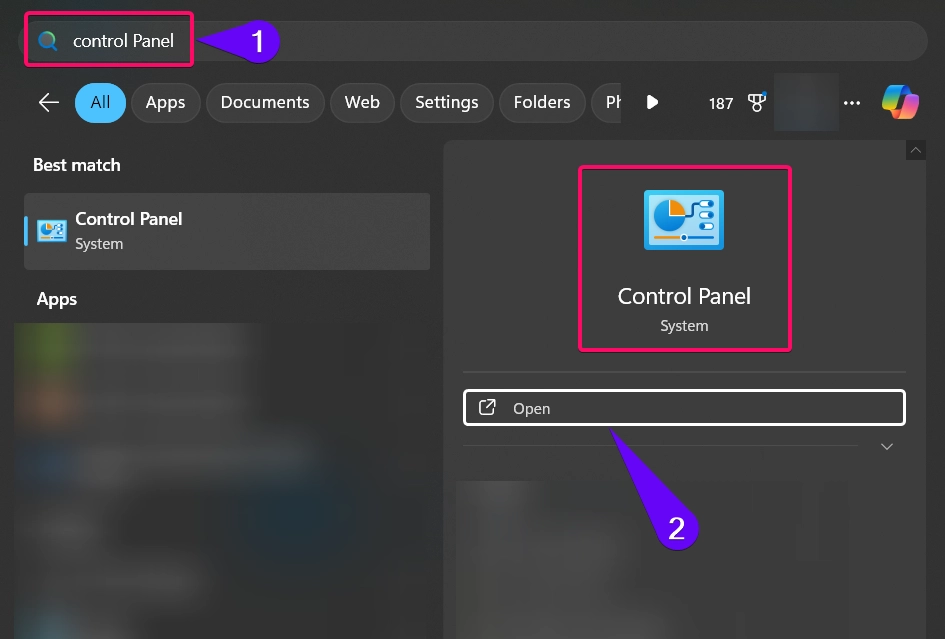
- Open Control Panel by searching for it in the Windows search bar.
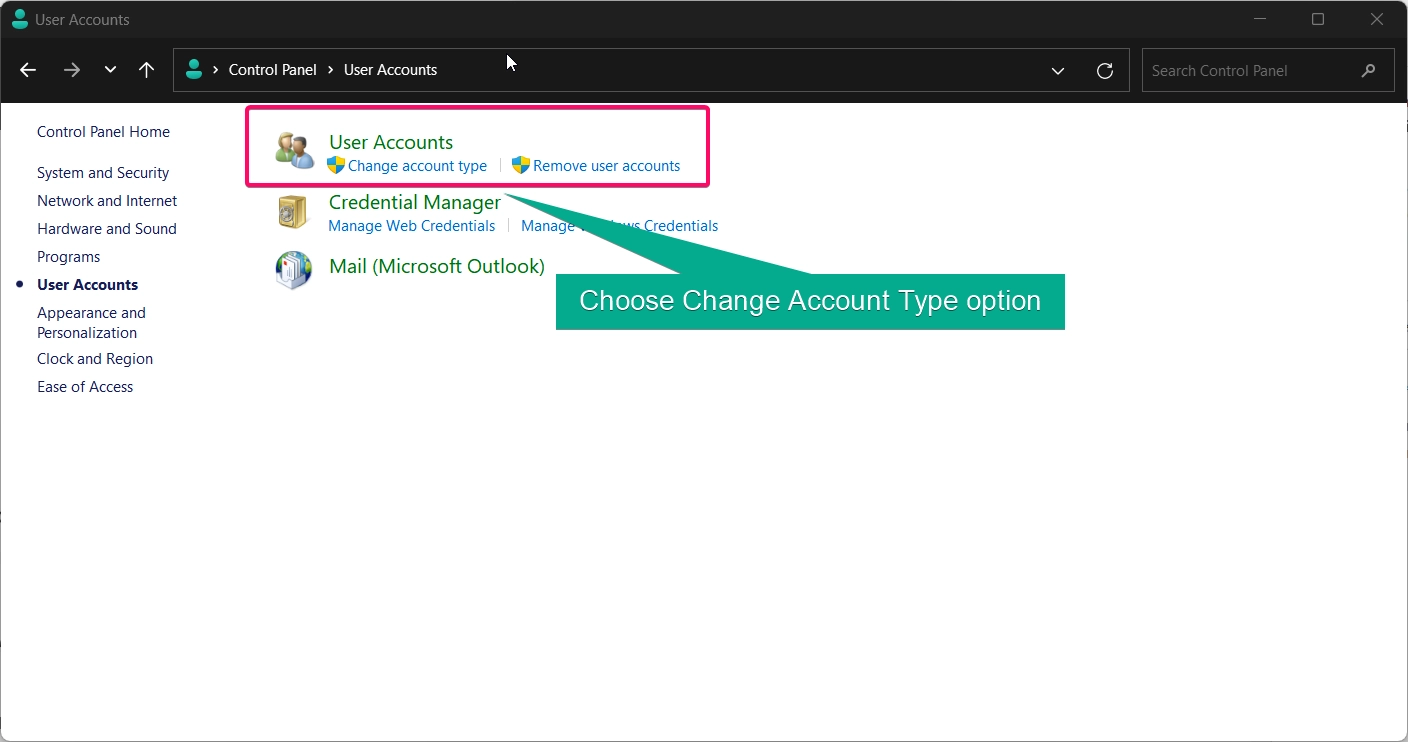
- Go to User Accounts and select Change account type.
- Choose the user account you want to modify.
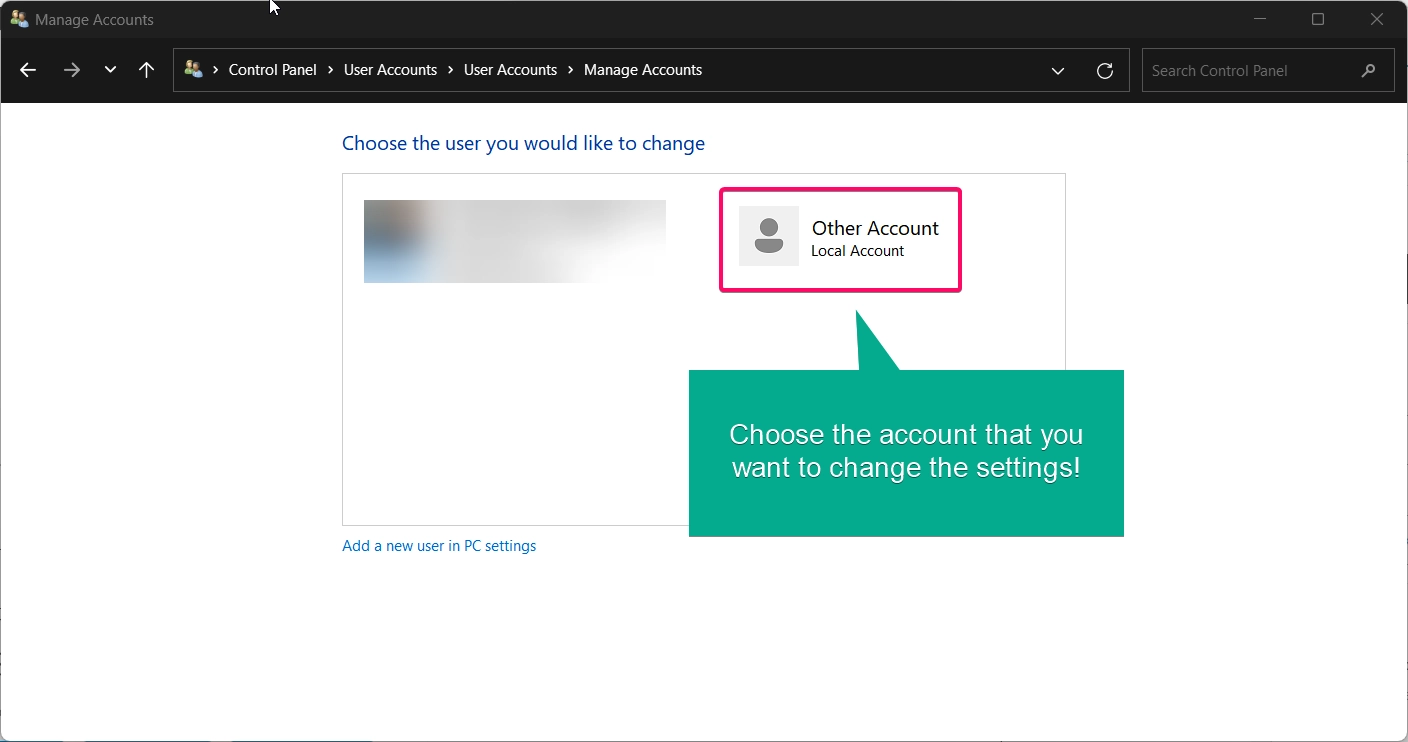
- Click on Change the account type.
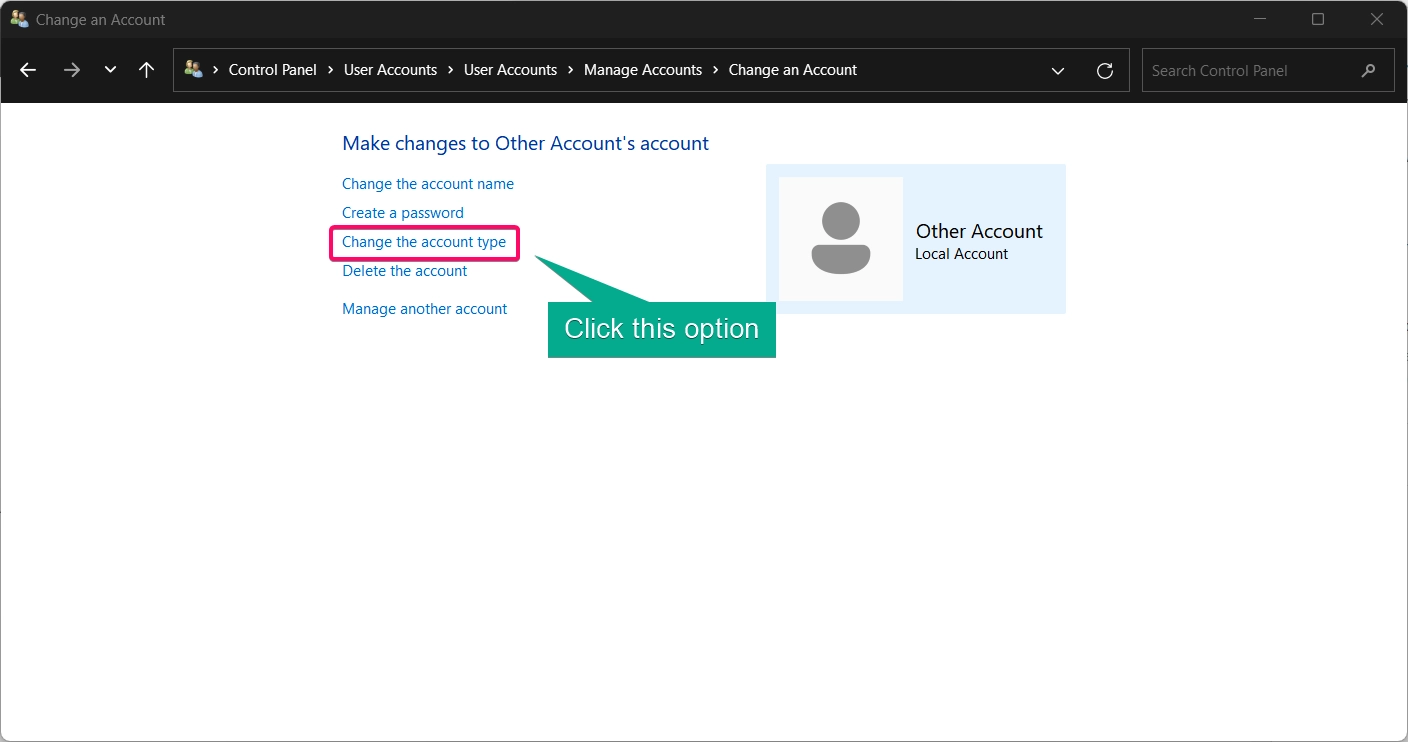
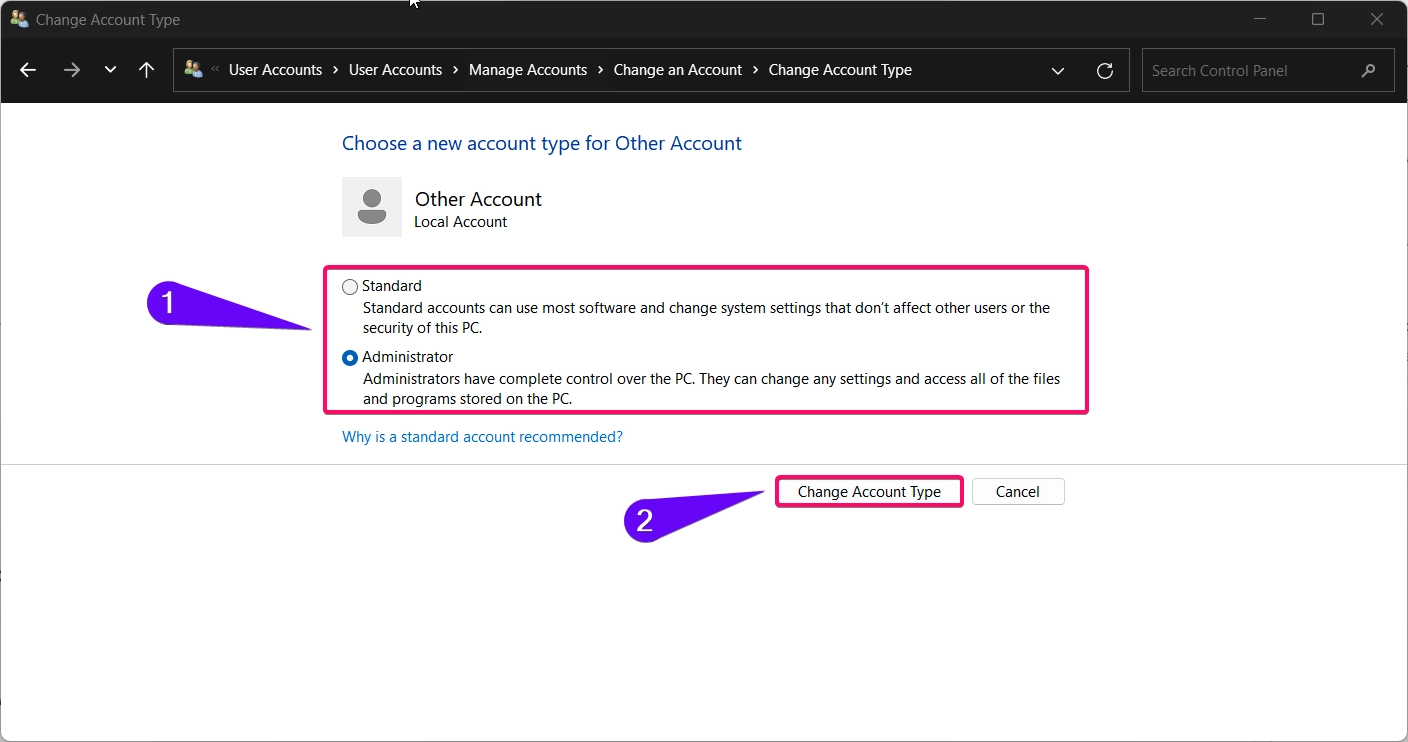
- Select Standard or Administrator and click Change Account Type to confirm.
Note: Control Panel provides access to various account management options, making it a versatile tool for managing users.
Method 3: Using Command Prompt
For users comfortable with the Command Prompt, this method allows you to quickly change an account type via commands:
- Open Command Prompt as Administrator by typing “cmd” in the search bar, right-clicking, and selecting Run as administrator.
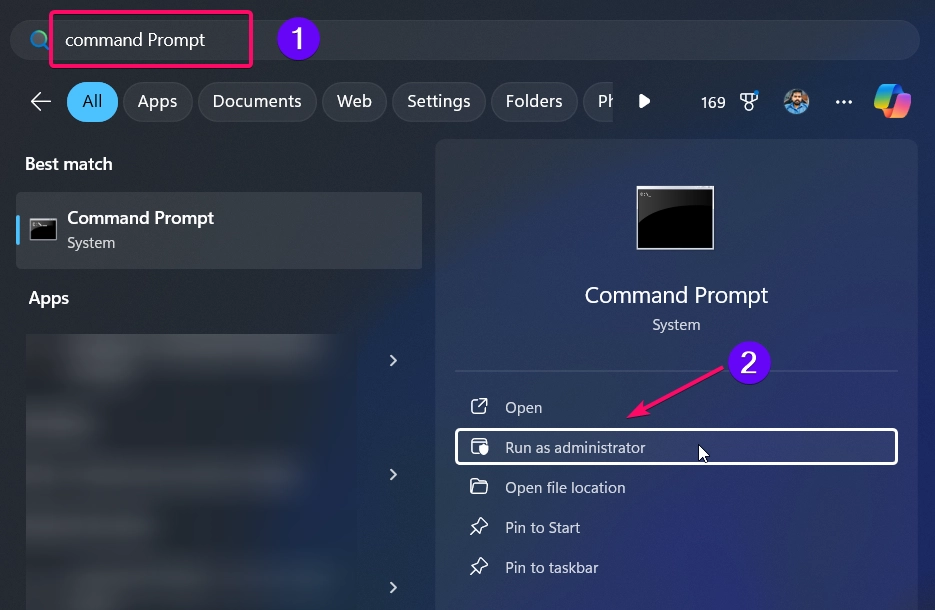
- To change an account to Administrator, enter the following command:
net localgroup administrators "Username" /add- Replace Username with the actual name of the user account.

- To change an account to Standard, use this command:
net localgroup administrators "Username" /delete

- Close Command Prompt.
Using Command Prompt can be faster, especially for experienced users who prefer command-line tools.
See Also: Change Account Picture In Windows 11
Method 4: Using PowerShell
PowerShell also provides an efficient way to change an account type in Windows 11:
- Open PowerShell as Administrator by right-clicking the Start button and selecting Windows Terminal (Admin).
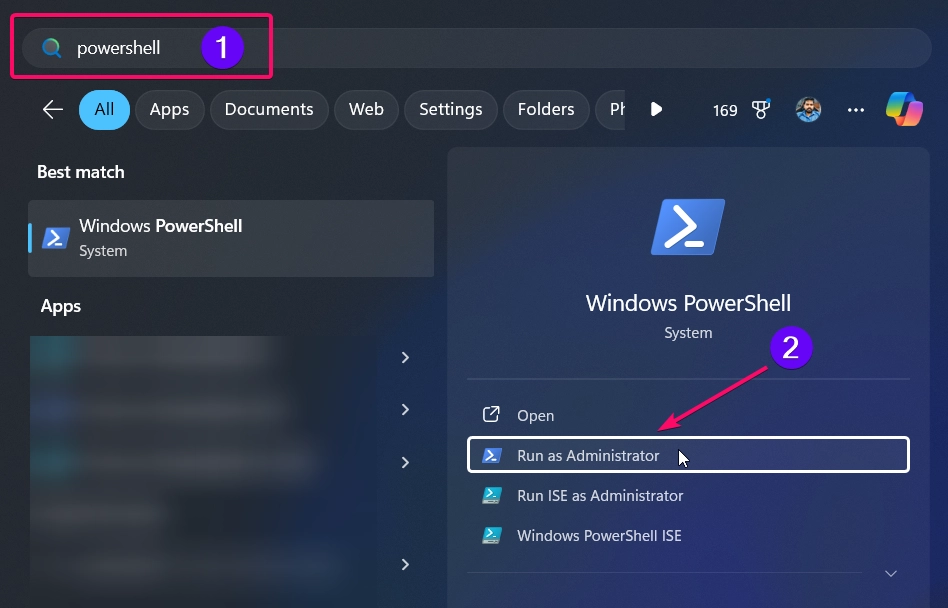
- To change an account to Administrator, enter:
Add-LocalGroupMember -Group "Administrators" -Member "Username"

- To revert to Standard, use:
Remove-LocalGroupMember -Group "Administrators" -Member "Username"

- Replace “Username” with the name of the account you want to modify.
PowerShell offers a fast and precise way to manage account types for those familiar with command-line operations.
Method 5: Using Local Users and Groups
Note: This method is available only in Windows 11 Pro, Enterprise, and Education editions.
The Local Users and Groups tool offers more control over user accounts, allowing you to change account types easily:
Related: Change Account Password In Windows 11
- Press Winkey + R to open the Run dialog, type
lusrmgr.msc, and press Enter.
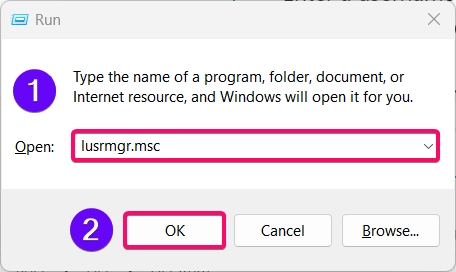
- In the Local Users and Groups window, select Users.
- Right-click the account you want to modify and choose Properties.
- Go to the Member Of tab. To change to an Administrator, click Add, type Administrators, and press OK.
- To change to Standard, remove the Administrators group from the Member Of tab.
- Click Apply and then OK to confirm changes.
This method is ideal for advanced users who need additional control over account types.
Conclusion
Changing an account type in Windows 11 is simple and offers flexibility in managing user access and permissions. Whether you use the Settings app, Control Panel, Command Prompt, PowerShell, or Local Users and Groups, each method provides a unique way to customize account permissions. By following these steps, you can ensure the right level of access for every user on your device.
Frequently ASked Queries:
Can I change my account type if I’m logged in as a Standard user?
No, you need Administrator privileges to change account types.
Is there a difference between local accounts and Microsoft accounts when changing account types?
No, both local and Microsoft accounts can be set to Standard or Administrator.
Read This: Change User Account Name In Windows 11
Will changing an account to Administrator give it access to all files?
No, but it will allow access to system settings and the ability to make system-wide changes.
Can I change the account type of the built-in Administrator account?
The built-in Administrator account is already set as an Administrator and cannot be changed to Standard.
How can I check the current account type?
Go to Settings > Accounts > Your Info to view your current account type.
Read More:
- How to Add/Remove Common Program Groups from Start Menu in Windows 11?
- How to Add/Remove Android Apps from Your Phone to Start on Windows 11 PC?
- How to Turn On/Off Airplane Mode in Windows 11?
