How to Add or Remove the Account Picture Menu on the Start Menu in Windows 11?
3 Easy and Unique ways to to Add or Remove the Account Picture Menu on the Start Menu in Windows 11!
The account picture menu on the Start menu in Windows 11 provides quick access to user account settings, allowing users to switch accounts, sign out, or change their account picture. While convenient, some users prefer a cleaner Start menu layout without this menu. This tutorial covers all methods to add or remove the account picture menu on the Start menu in Windows 11. Customizing the account picture menu gives you control over your Start menu’s appearance. Removing this menu can create a more non disturbed interface, which can be particularly helpful if you don’t use multiple accounts or prefer minimal distractions.
Related: Add/remove Common Program Groups From Start Menu In Windows 11
Method 1: Using the Settings App
The easiest way to add or remove the account picture menu is through the Settings app. Here’s how:
- Open Settings by pressing Winkey + I.
- Go to Personalization in the left sidebar.
- Select Start from the list of options.
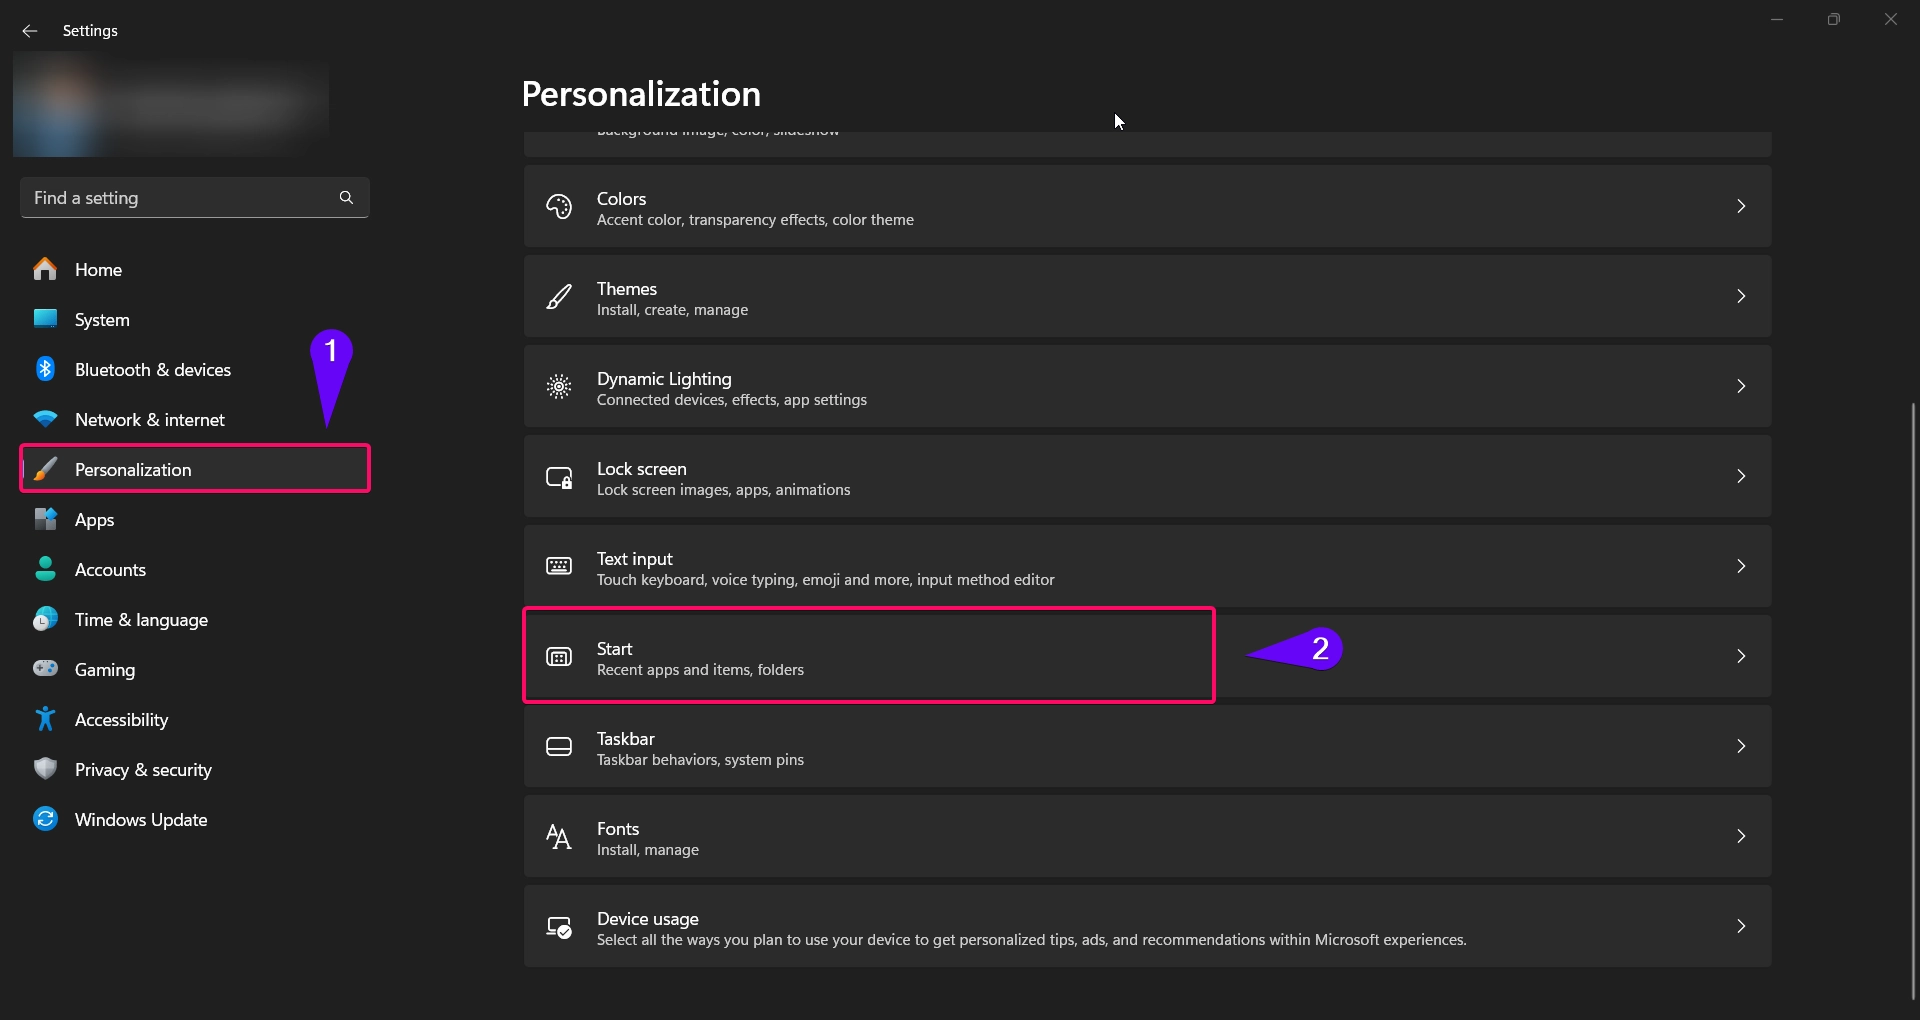
- In the Start settings, find the “Show account picture on Start menu” option.
- Toggle this option On to show the account picture menu or Off to remove it from the Start menu.
This change takes effect immediately, allowing you to customize the appearance of your Start menu in seconds.
Method 2: Using Group Policy Editor
Note: This method is only available in Windows 11 Pro, Enterprise, and Education editions.
For users who prefer more control, the Group Policy Editor provides an alternative method to hide or show the account picture menu:
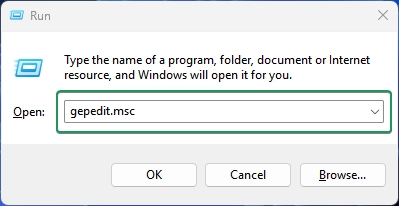
- Press Winkey + R, type
gpedit.msc, and press Enter to open the Group Policy Editor.
- Navigate to the following path:
User Configuration > Administrative Templates > Start Menu and Taskbar
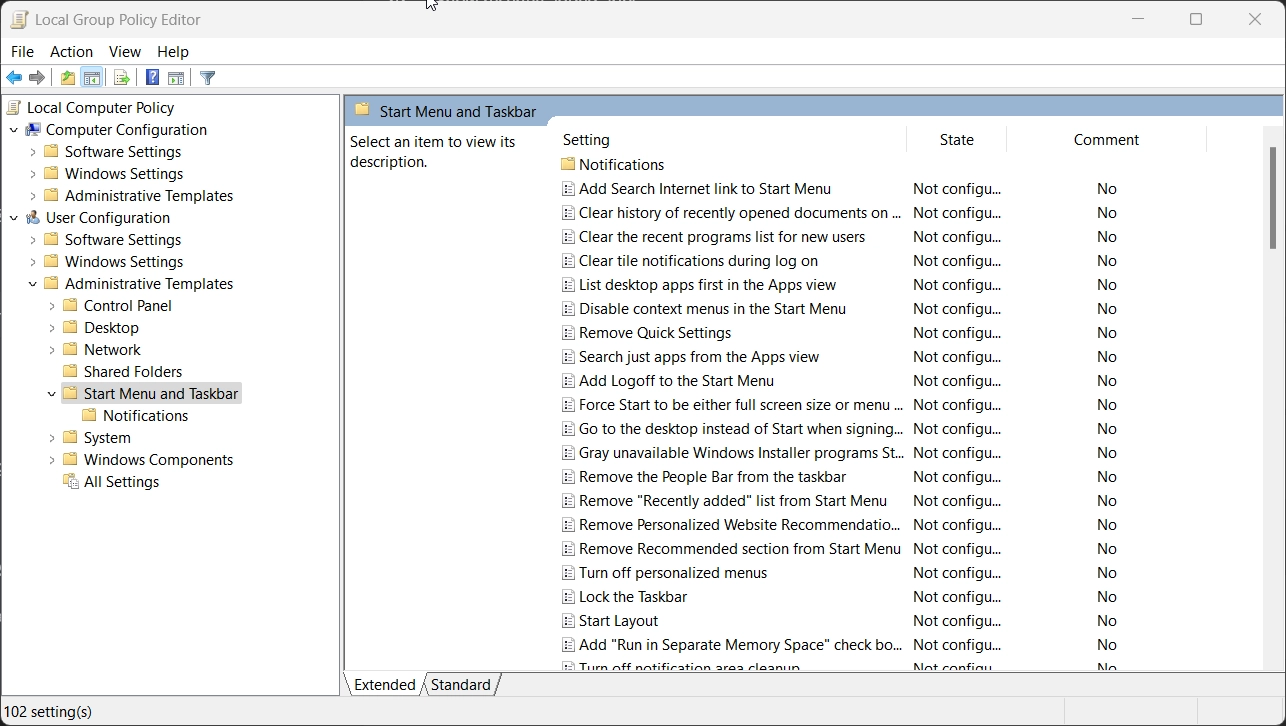
- Find “Do not display the user’s account picture on the Start menu” and double-click on it.
- Select Enabled to remove the account picture menu or Disabled to show it.
- Click Apply and then OK to save the settings.
This method is ideal for users who need to enforce a consistent interface across multiple accounts or devices.
Method 3: Using the Registry Editor
Important: Editing the registry can potentially cause system issues if not done correctly. Back up the registry before making any changes.
If you prefer advanced options, you can use the Registry Editor to enable or disable the account picture menu:
- Press Winkey + R, type
regedit, and press Enter to open the Registry Editor. - Navigate to the following registry key:
HKEY_CURRENT_USER\Software\Microsoft\Windows\CurrentVersion\Policies\Explorer
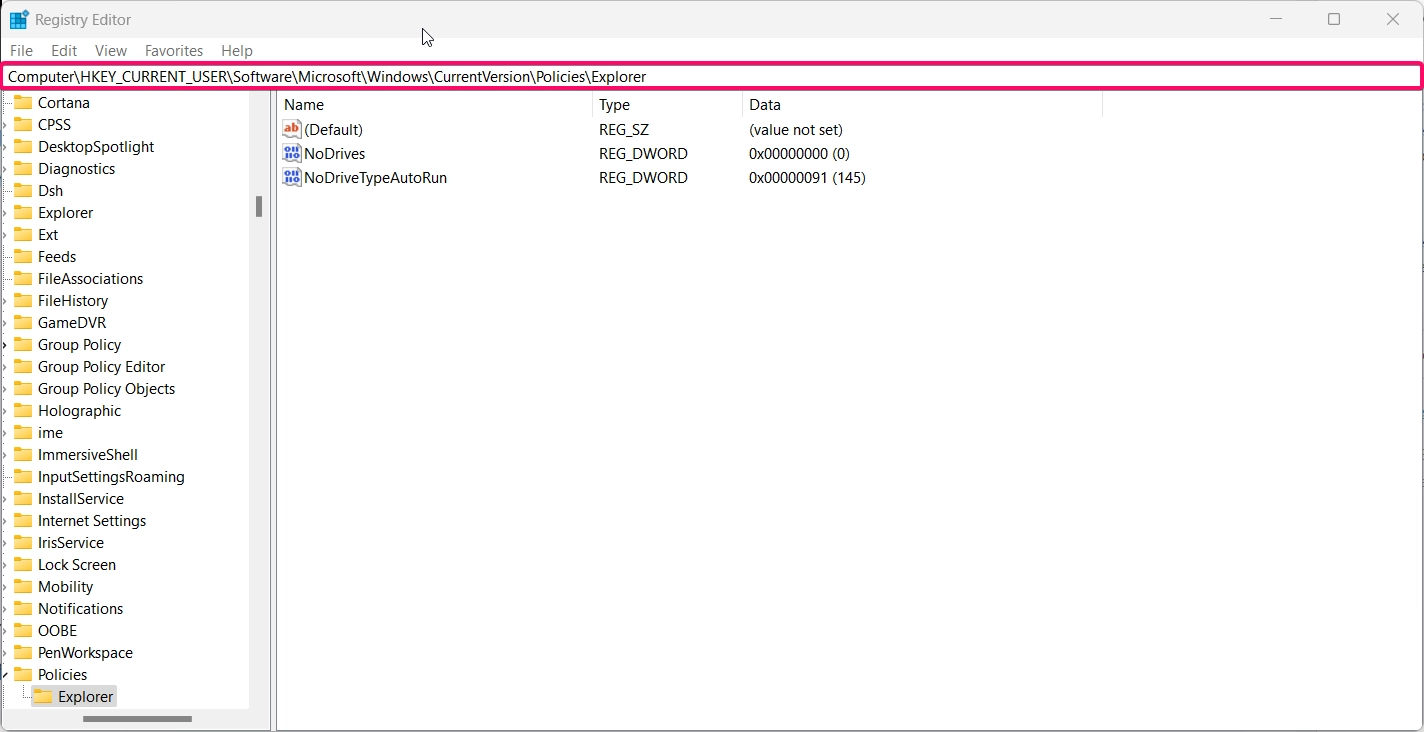
- Right-click on the right pane and select New > DWORD (32-bit) Value.
- Name the new DWORD NoUserPicture.
- Set the value of NoUserPicture to:
1to remove the account picture menu.0to add the account picture menu.
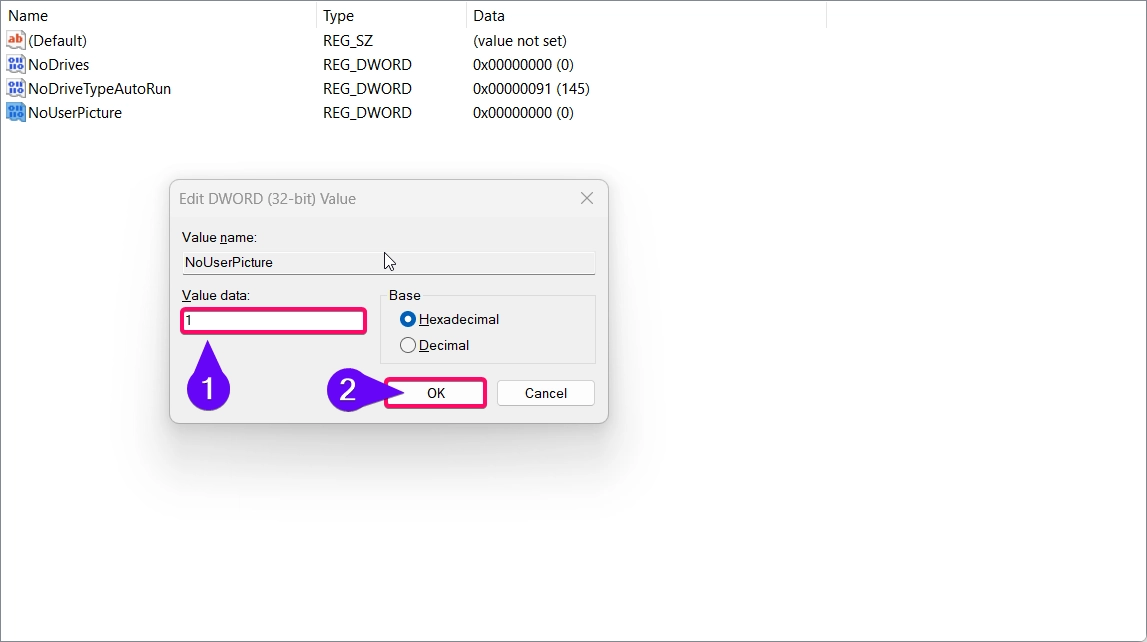
- Close the Registry Editor and restart your computer for the changes to apply.
Alternate Method:
[HKEY_LOCAL_MACHINE\SOFTWARE\Microsoft\PolicyManager\default\Start\HideUserTile]
“value”=dword:00000001Related: Add Or Remove “boot To Advanced Startup” Context Menu In Windows 11
- Save the above code as Remove_account_picture_menu_from_Start_menu_for_all_users.reg
- Run the .reg file and restart your pc to remove the account picture form the start menu.
[HKEY_LOCAL_MACHINE\SOFTWARE\Microsoft\PolicyManager\default\Start\HideUserTile]
“value”=dword:00000000
- Save the above code as Add_account_picture_menu_from_Start_menu_for_all_users.reg
- Run the .reg file and restart your pc to reappear the account picture form the start menu.
This method provides a robust way to manage the account picture menu settings and can be beneficial for users familiar with registry editing.
Why Remove the Account Picture Menu?
Removing the account picture menu is useful for users who don’t frequently switch accounts or adjust account settings. It creates a simpler, cleaner Start menu, which can improve focus and provide a more organized desktop experience.
Conclusion
Adding or removing the account picture menu on the Start menu in Windows 11 allows you to personalize your Start menu according to your needs. Whether you use the Settings app, Group Policy Editor, or Registry Editor, these methods ensure full control over this feature. By following these steps, you can keep your Start menu layout minimal or re-enable the account picture menu for easy access to account settings.
Check Out: Enable/disable The Built-in Administrator Account In Windows 11
Frequently ASked Questions:
Can I add the account picture menu without changing other Start menu settings?
Yes, toggling the account picture menu won’t affect other Start menu settings.
Why don’t I see the Group Policy option to disable the account picture menu?
The Group Policy Editor is only available in Windows 11 Pro, Enterprise, and Education editions. Home edition users can use the Settings app or Registry Editor.
Does removing the account picture menu affect my user profile?
No, this setting only hides the menu; it doesn’t affect your profile or account settings.
Can I add the account picture menu back after removing it?
Yes, you can re-enable it anytime using the same methods described above.
See Also: Add/remove “add To Favorites” Context Menu In Windows 11
Will removing the account picture menu improve performance?
Removing it has minimal impact on performance. This customization is more about visual preference and simplicity.
Read More:
- How to Add/Remove Common Program Groups from Start Menu in Windows 11?
- How to Add/Remove Android Apps from Your Phone to Start on Windows 11 PC?
- How to Turn On/Off Airplane Mode in Windows 11?
