How to Turn On/Off Facial Recognition Auto Dismiss Lock Screen in Windows 11?
What are the multiple methods to to Turn On/Off Facial Recognition Auto Dismiss Lock Screen in Windows 11 pc?
Windows 11 offers a convenient Facial Recognition feature that allows users to unlock their devices simply by looking at the screen. With the Auto Dismiss Lock Screen setting, Windows 11 can automatically bypass the lock screen once your face is recognized, taking you straight to the desktop. In this guide, we’ll walk you through how to turn on or off Auto Dismiss Lock Screen for facial recognition in Windows 11 using different methods.
Why Use Auto Dismiss Lock Screen with Facial Recognition?
Enabling Auto Dismiss helps users save time by instantly accessing the desktop without needing to swipe or click on the lock screen. This feature is ideal for those who prioritize quick and seamless access to their system, as it minimizes the number of steps required to get to the desktop.
Method 1: Using Windows Settings
The Settings app is the most straightforward way to configure the Auto Dismiss Lock Screen feature. Here’s how:
- Open Settings by pressing Winkey + I.
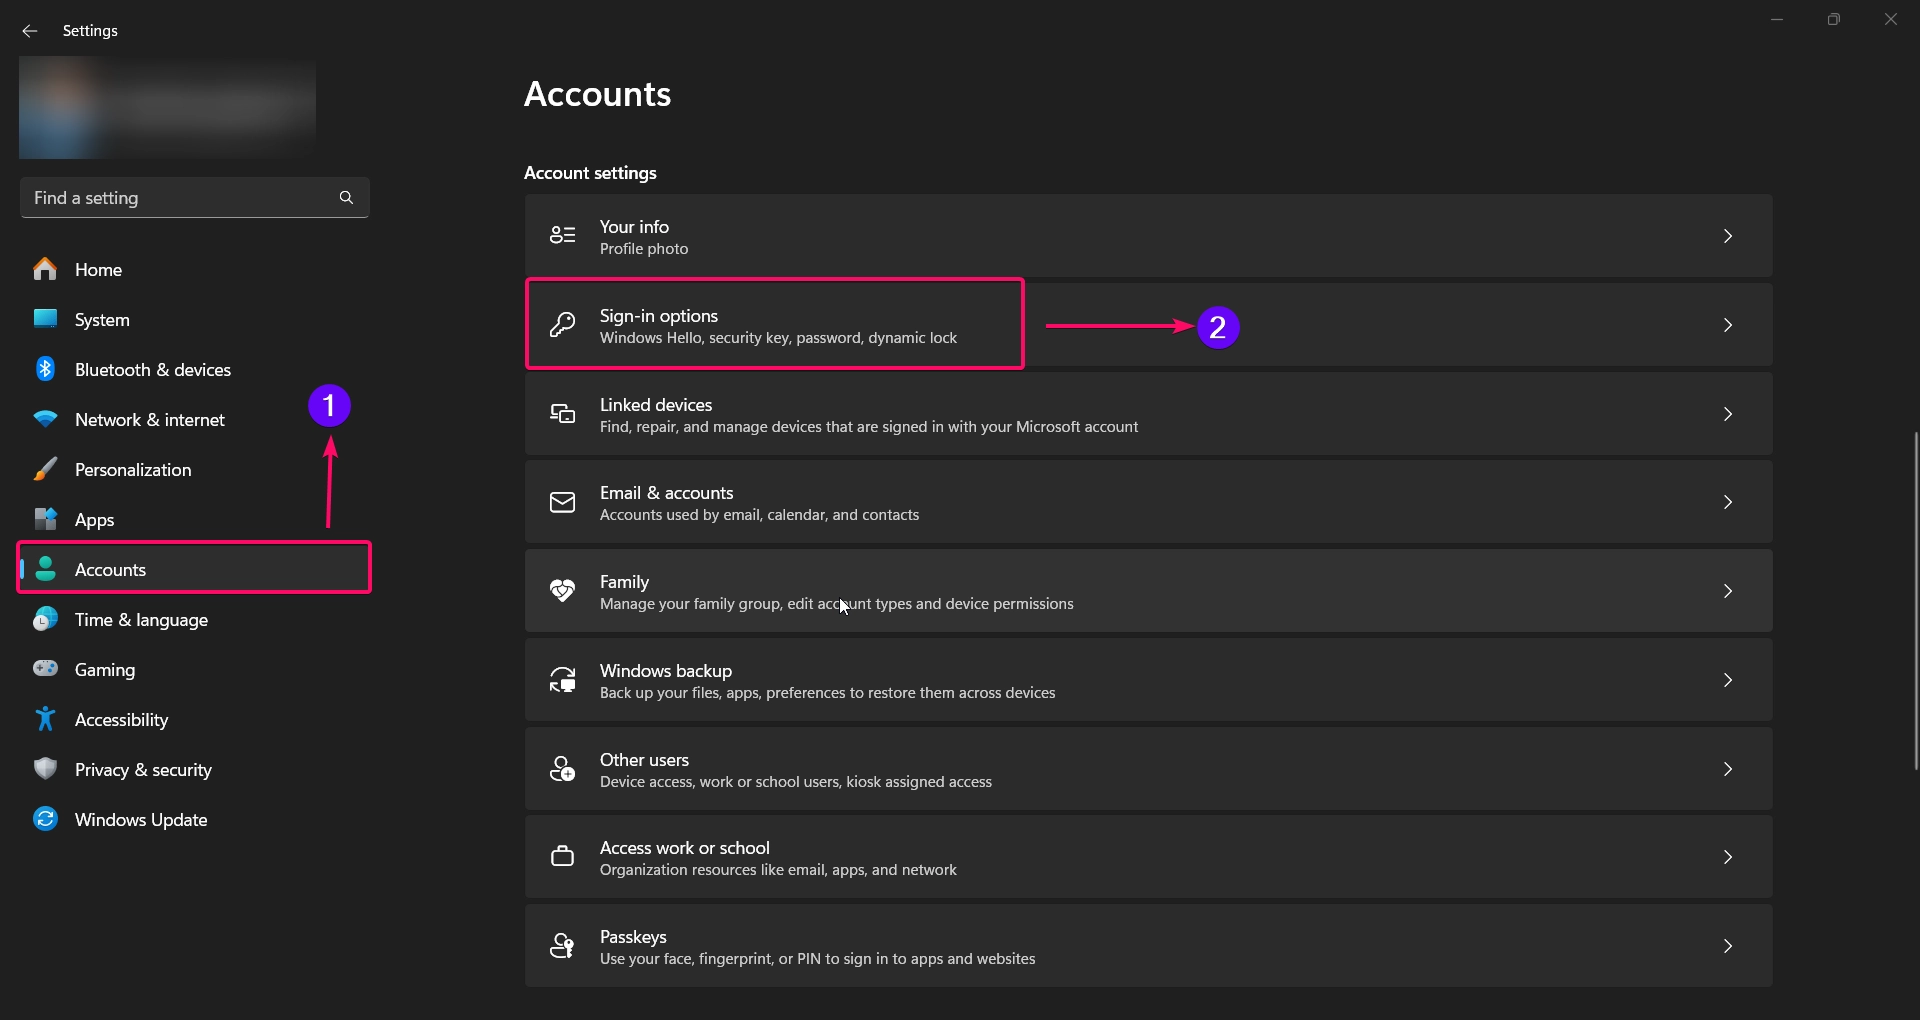
- Navigate to Accounts on the left panel.
- Select Sign-in options from the right side.
- In the Facial Recognition (Windows Hello) section, click on Improve recognition if needed.
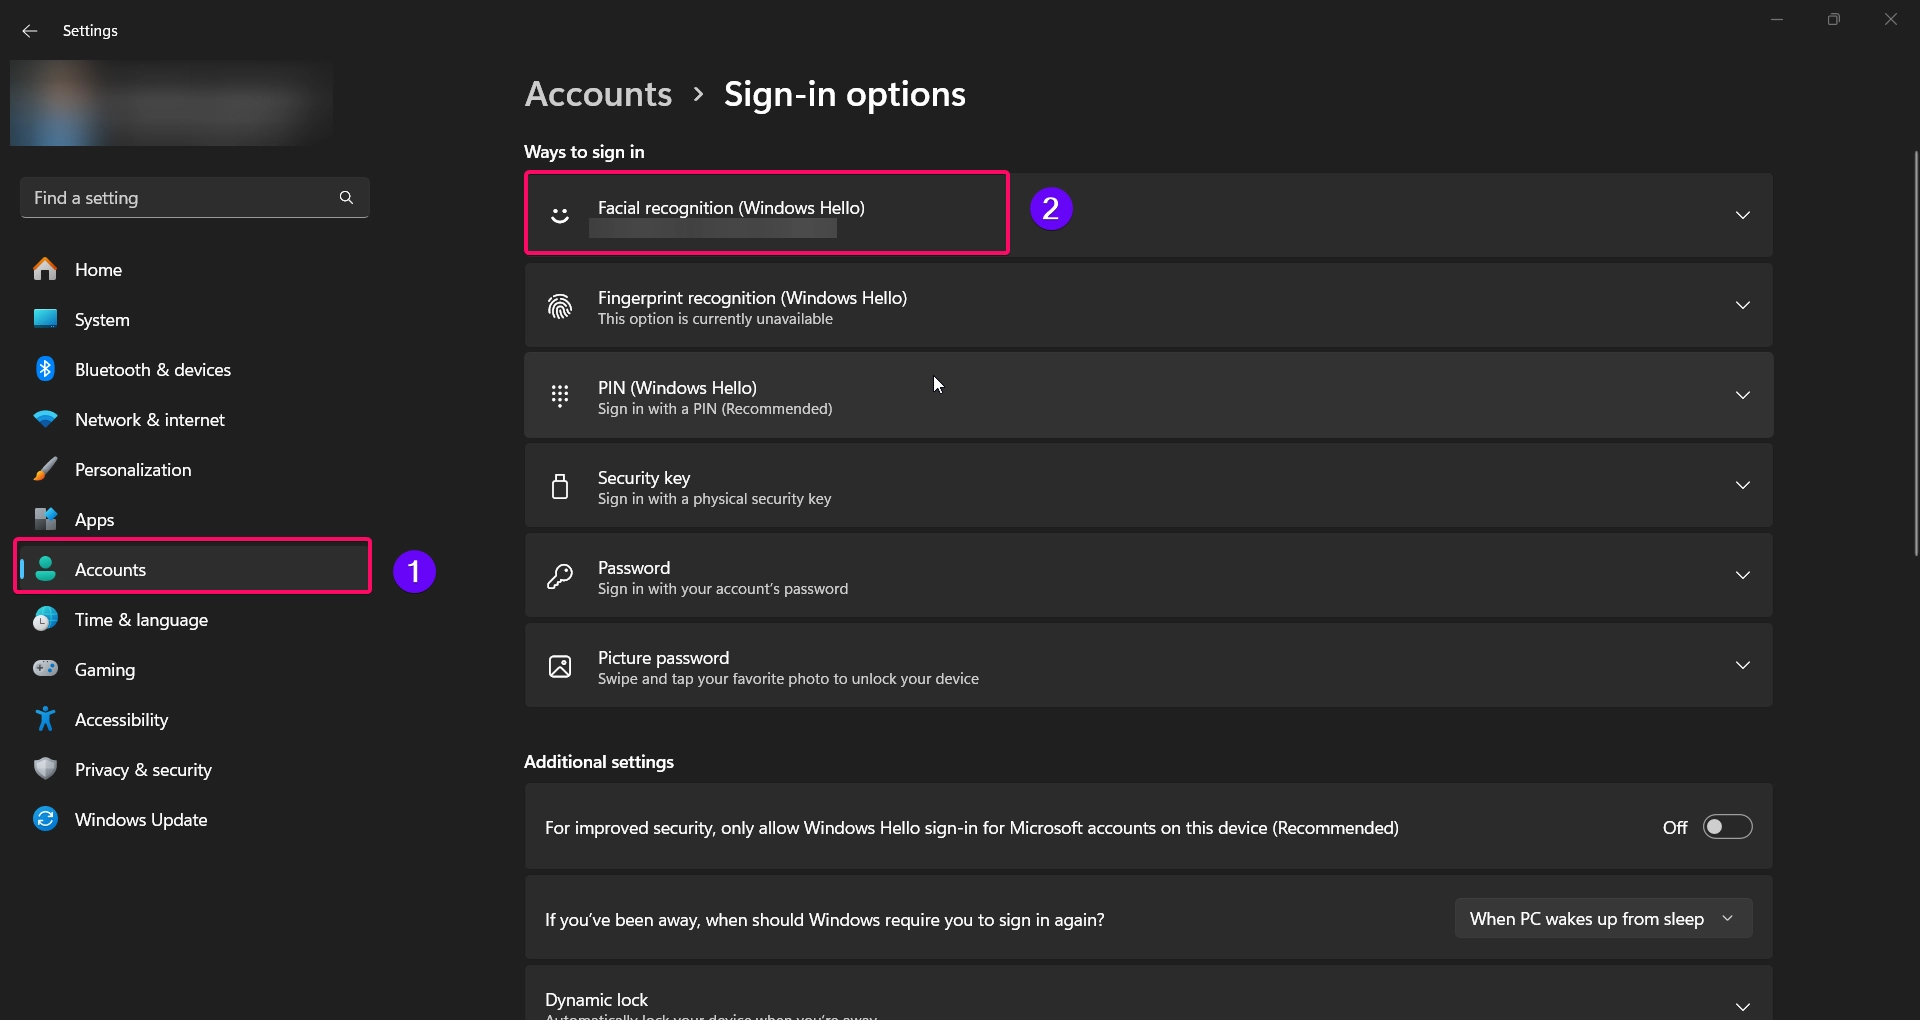
- Find and toggle the Automatically dismiss the lock screen if Windows recognizes your face option:
- Turn it On if you want to auto-dismiss the lock screen after recognition.
- Turn it Off if you prefer to manually dismiss the lock screen after facial recognition.
This setting applies immediately, allowing you to experience the change as soon as you lock and unlock your computer.
Method 2: Using Group Policy Editor
Note: The Group Policy Editor is available only in Windows 11 Pro, Enterprise, and Education editions.
If you’re using a Pro or Enterprise edition, the Group Policy Editor provides additional control over sign-in options, including facial recognition settings:
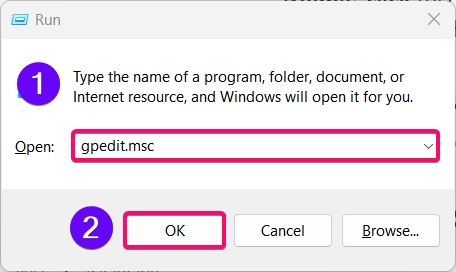
- Press Winkey + R to open the Run dialog, type
gpedit.msc, and press Enter.
- Navigate to the following path:
Computer Configuration > Administrative Templates > System > Logon
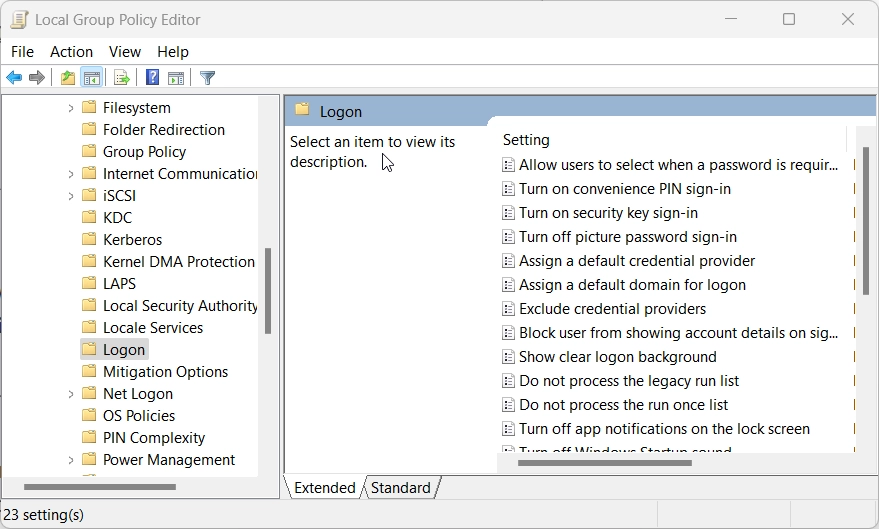
- Look for the policy named Configure Automatic Lock Screen Dismissal using Biometrics.
- Double click this policy and select Enabled to turn on auto-dismiss, or Disabled to turn it off.
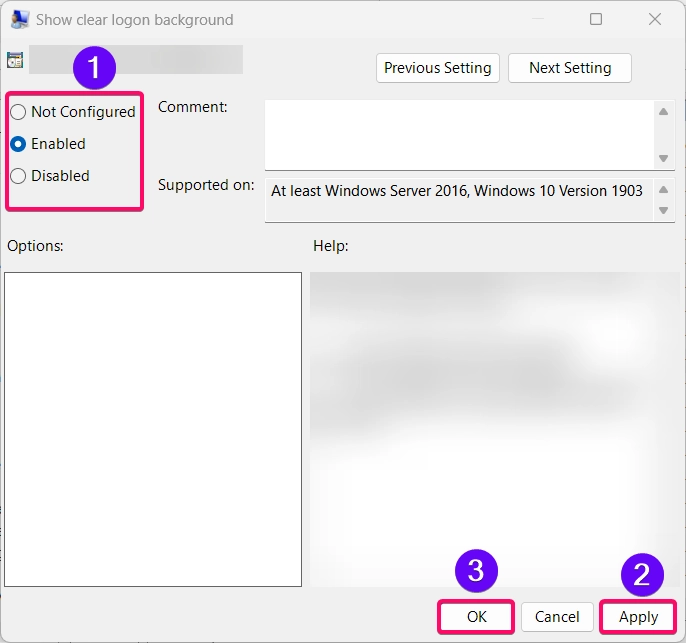
- Click Apply and then OK to save your changes.
This method provides a more controlled approach to managing the Auto Dismiss feature, especially for users on shared or enterprise devices.
Method 3: Using Registry Editor
Important: Editing the registry can affect your system if not done correctly. Be sure to back up the registry before making changes.
If you’re comfortable with advanced settings, you can enable or disable the Auto Dismiss feature using the Registry Editor:
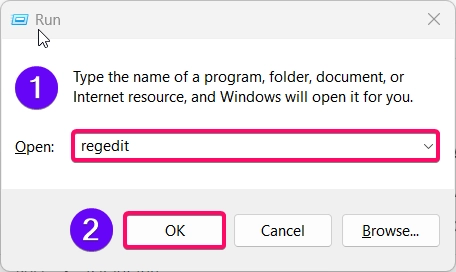
- Press Winkey + R to open the Run dialog, type
regedit, and press Enter.
- Navigate to the following key:
HKEY_LOCAL_MACHINE\SOFTWARE\Microsoft\Windows NT\CurrentVersion\Winlogon
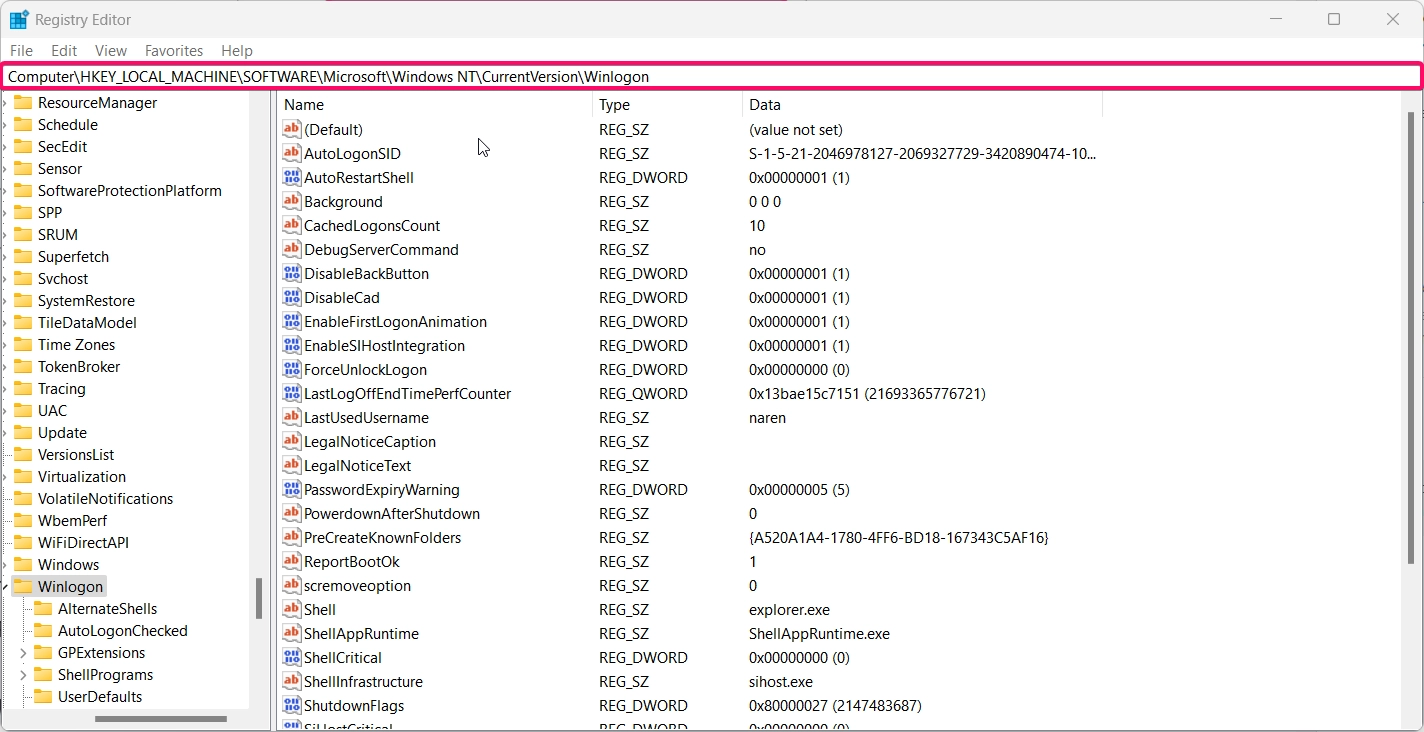
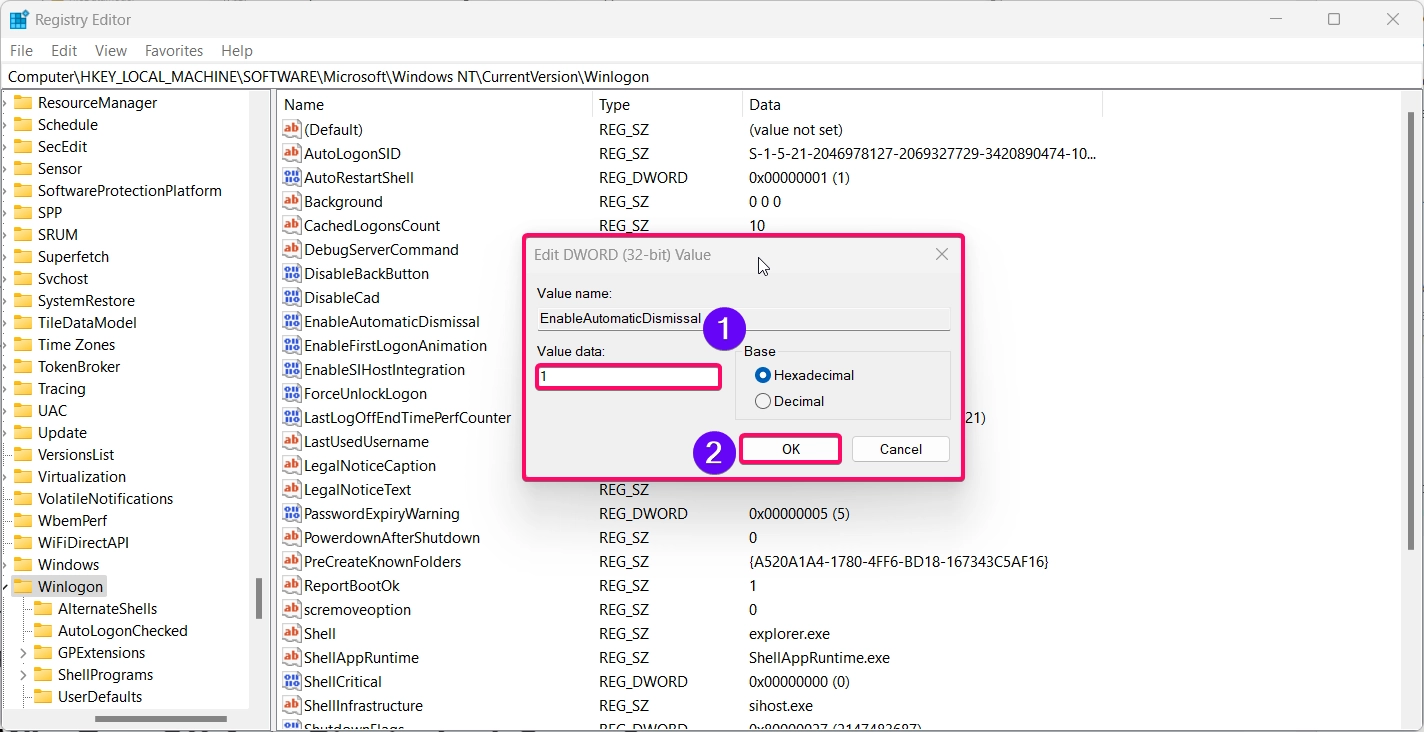
- Look for a DWORD value named EnableAutomaticDismissal. If it doesn’t exist, create a new
DWORD (32-bit) Valueand name it EnableAutomaticDismissal. - Set the value to:
1to enable Auto Dismiss after facial recognition.0to disable Auto Dismiss.
- Restart your computer for the changes to take effect.
This method is ideal for advanced users who want more control over system settings and prefer using the Registry Editor.
Why Turn Off Auto Dismiss Lock Screen?
Disabling Auto Dismiss allows you to retain an extra layer of control and privacy, as you’ll have to manually dismiss the lock screen even after your face is recognized. This can be beneficial if you prefer more secure access to your desktop, especially in shared environments.
Conclusion
Configuring Facial Recognition Auto Dismiss Lock Screen in Windows 11 is a simple way to enhance your experience by choosing whether or not you want to skip the lock screen. Using the methods above, you can easily turn on or off this feature based on your needs, whether you prefer the convenience of automatic access or the security of manual dismissal.
Questions asked by users:
Can I use Auto Dismiss with other sign-in methods?
No, Auto Dismiss is specifically designed for facial recognition through Windows Hello.
Why don’t I see the Auto Dismiss option?
This option is available only if you have a compatible Windows Hello facial recognition camera and have set up facial recognition in Windows.
Is it safe to enable Auto Dismiss Lock Screen?
Yes, but remember that enabling Auto Dismiss allows anyone with registered facial access to bypass the lock screen.
Can I use both fingerprint and facial recognition with Auto Dismiss?
Auto Dismiss applies only to facial recognition. Fingerprint login requires an additional swipe or touch to dismiss the lock screen.
Does Auto Dismiss work in all Windows 11 versions?
Auto Dismiss is available in Windows 11 Home and Pro editions, but Group Policy controls are only available in the Pro, Enterprise, and Education editions.
