How to Enable/Disable Administrator Protection for Admin Approval Mode in Windows 11?
Multiple Methods to Enable/Disable Administrator Protection for Admin Approval Mode in Windows 11 PC!
Windows 11 includes advanced security features like Admin Approval Mode, which adds an extra layer of protection for administrators. When enabled, this mode prompts for approval before allowing administrative tasks, ensuring greater control over critical system changes. This tutorial explains how to enable or disable Administrator Protection for Admin Approval Mode using multiple methods.
Related: Enable/disable Administrator Protection For Admin Approval Mode In Windows 11
Admin Approval Mode is a security feature in Windows that applies an additional layer of authentication for administrator accounts. When turned on, it requires explicit approval before executing tasks that require administrative privileges, reducing the risk of unauthorized system changes.
Why Enable or Disable Administrator Protection for Admin Approval Mode?
Enabling Administrator Protection ensures that even administrators have to confirm critical actions, increasing security. Disabling it may be preferred in controlled environments where additional prompts may disrupt workflows.
Method 1: Using Local Security Policy
The Local Security Policy is a straightforward way to configure Admin Approval Mode. Here’s how:
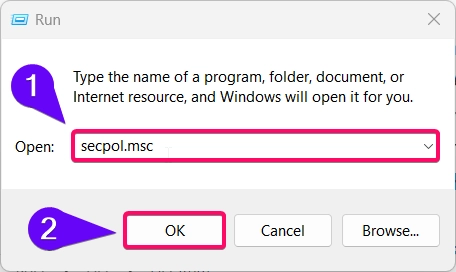
- Open Local Security Policy by typing
secpol.mscin the Windows search bar and pressing Enter.
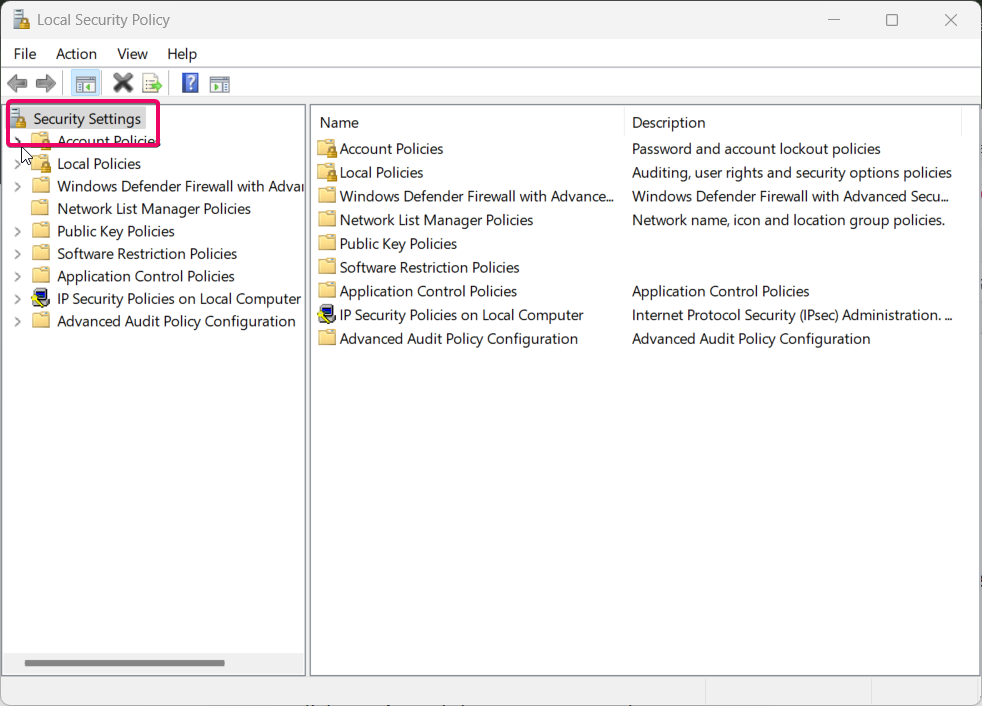
- Navigate to Local Policies > Security Options in the left pane.
- Locate the policy titled User Account Control: Admin Approval Mode for the Built-in Administrator Account.
- Double-click the policy to open its properties.
- To enable Administrator Protection, select Enabled. To disable it, choose Disabled.
- Click Apply and then OK to save changes.
- Restart your computer for the changes to take effect.
Method 2: Using Group Policy Editor
For systems with access to the Group Policy Editor, you can enable or disable Admin Approval Mode with the following steps:
- Press Winkey + R, type
gpedit.msc, and press Enter.
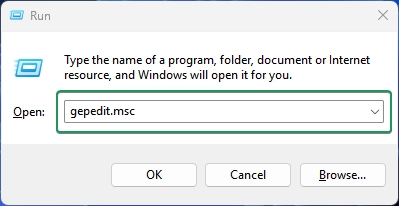
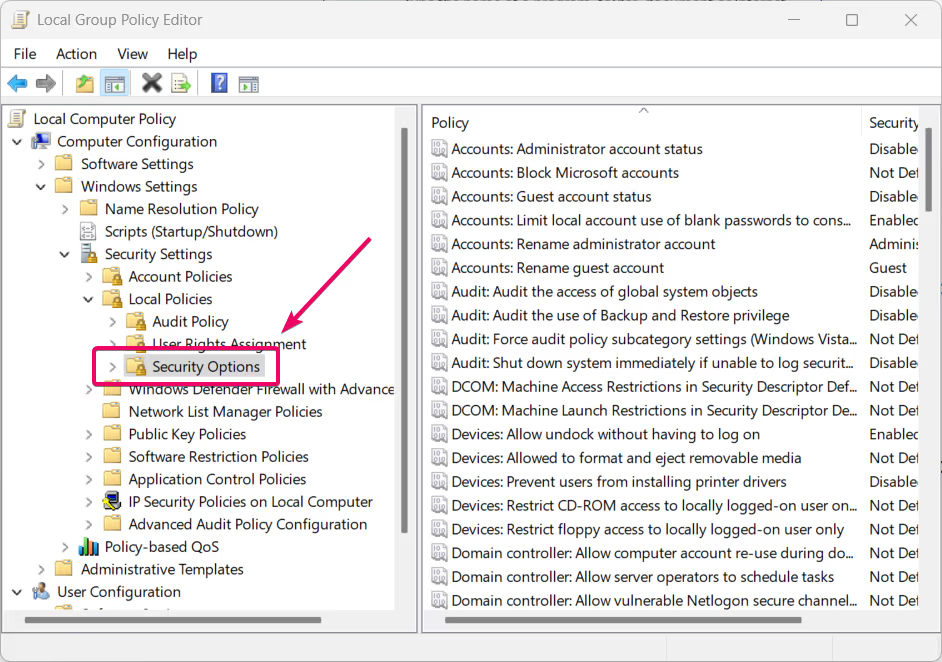
- Navigate to Computer Configuration > Windows Settings > Security Settings > Local Policies > Security Options.
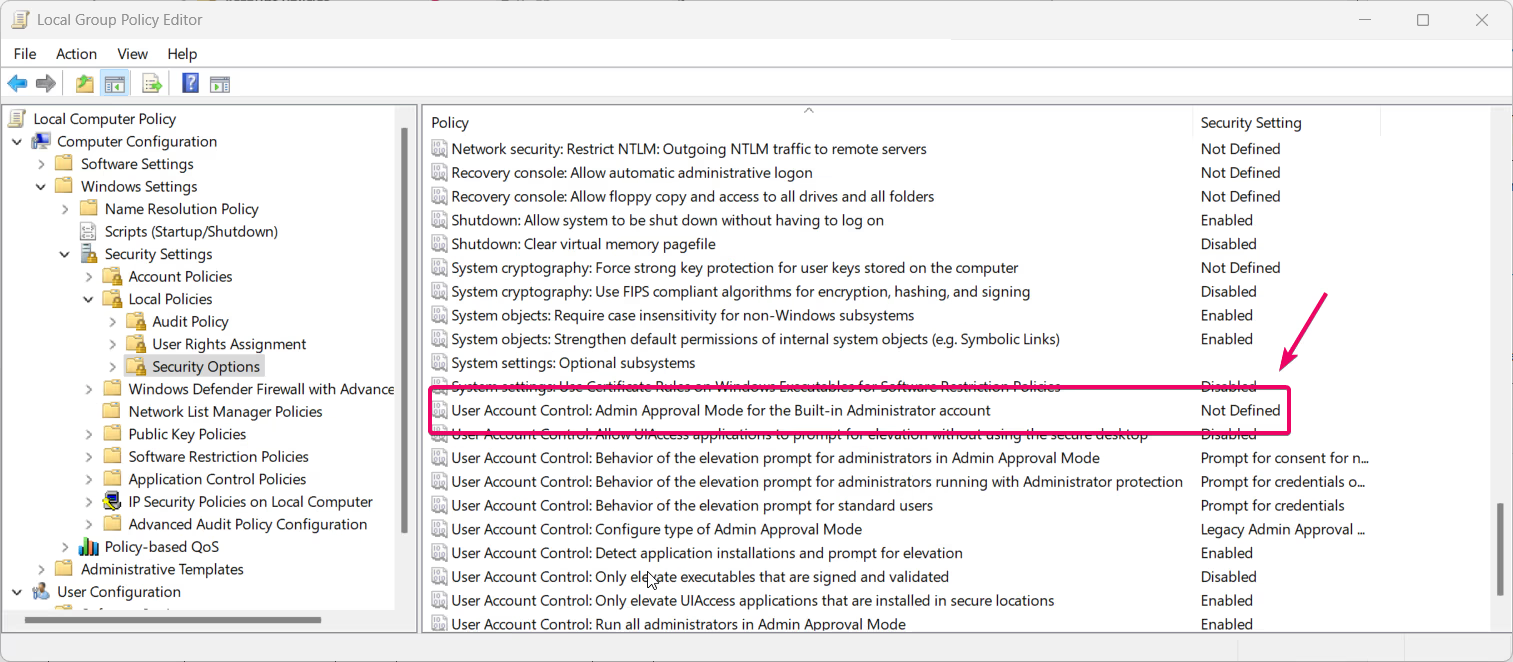
- Find the policy named User Account Control: Run all administrators in Admin Approval Mode.
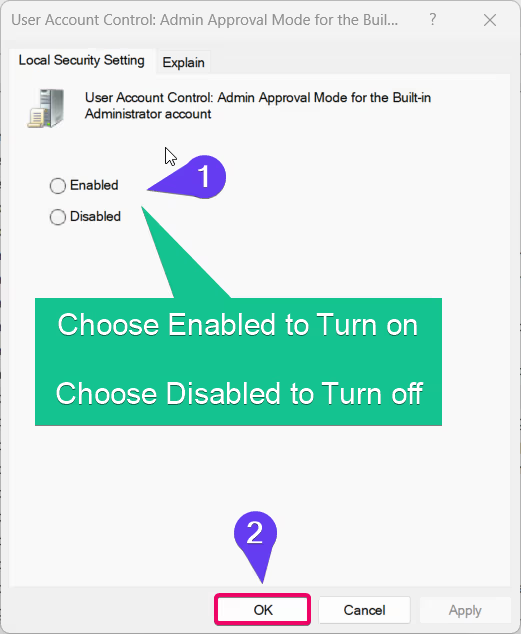
- Double-click the policy to open its settings.
- Select Enabled to turn on Admin Approval Mode or Disabled to turn it off.
- Click Apply and OK to confirm changes.
- Restart your system to implement the changes.
Method 3: Using Registry Editor
Important: Back up the registry before making any changes to avoid potential system issues.
For advanced users, the Registry Editor provides another method to modify Admin Approval Mode:
Related: Enable/disable Uac For Built-in Administrator In Windows 11
- Open the Registry Editor by pressing Winkey + R, typing
regedit, and pressing Enter.
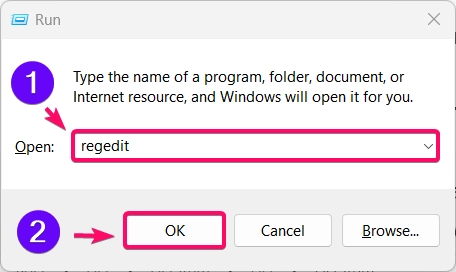
- Navigate to the following path:
HKEY_LOCAL_MACHINE\SOFTWARE\Microsoft\Windows\CurrentVersion\Policies\System
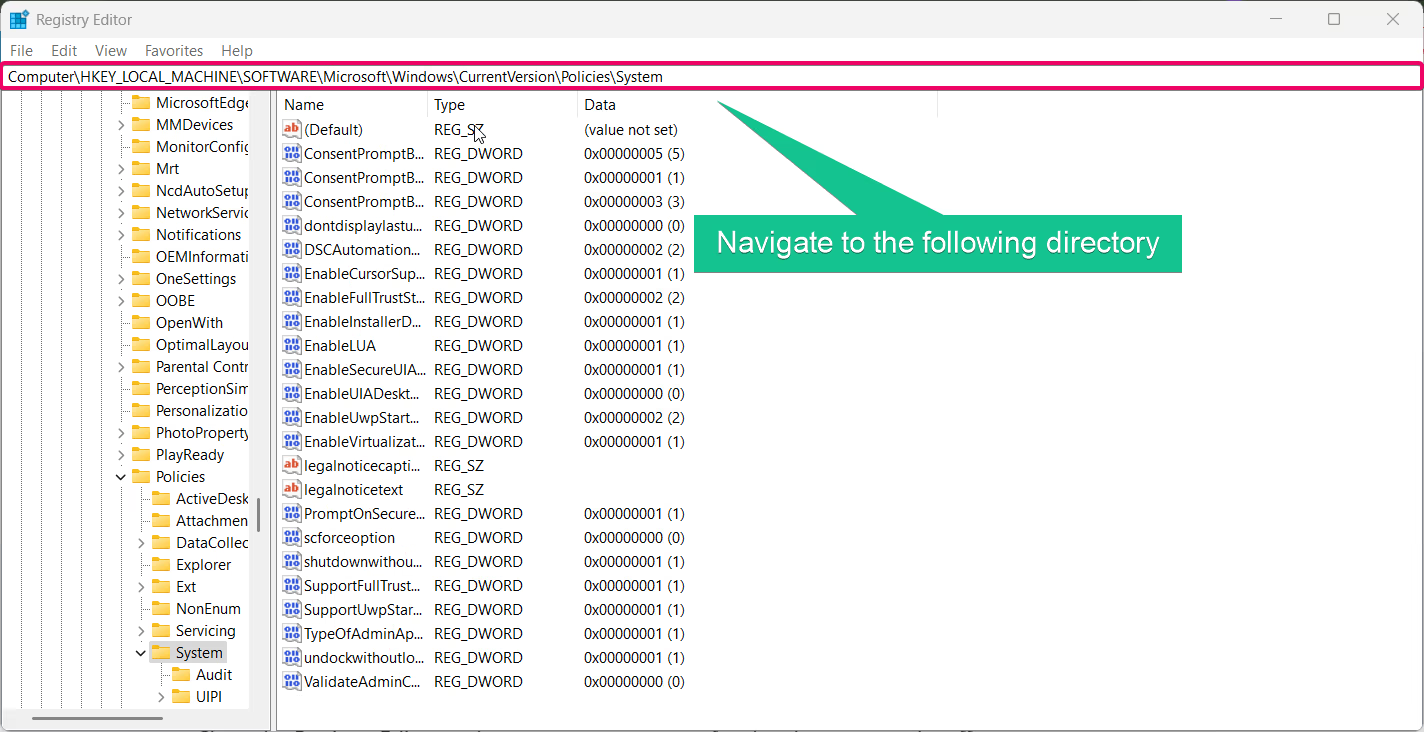
- Locate the EnableLUA key. If it doesn’t exist, create a new
DWORD (32-bit) Valuewith the name EnableLUA.
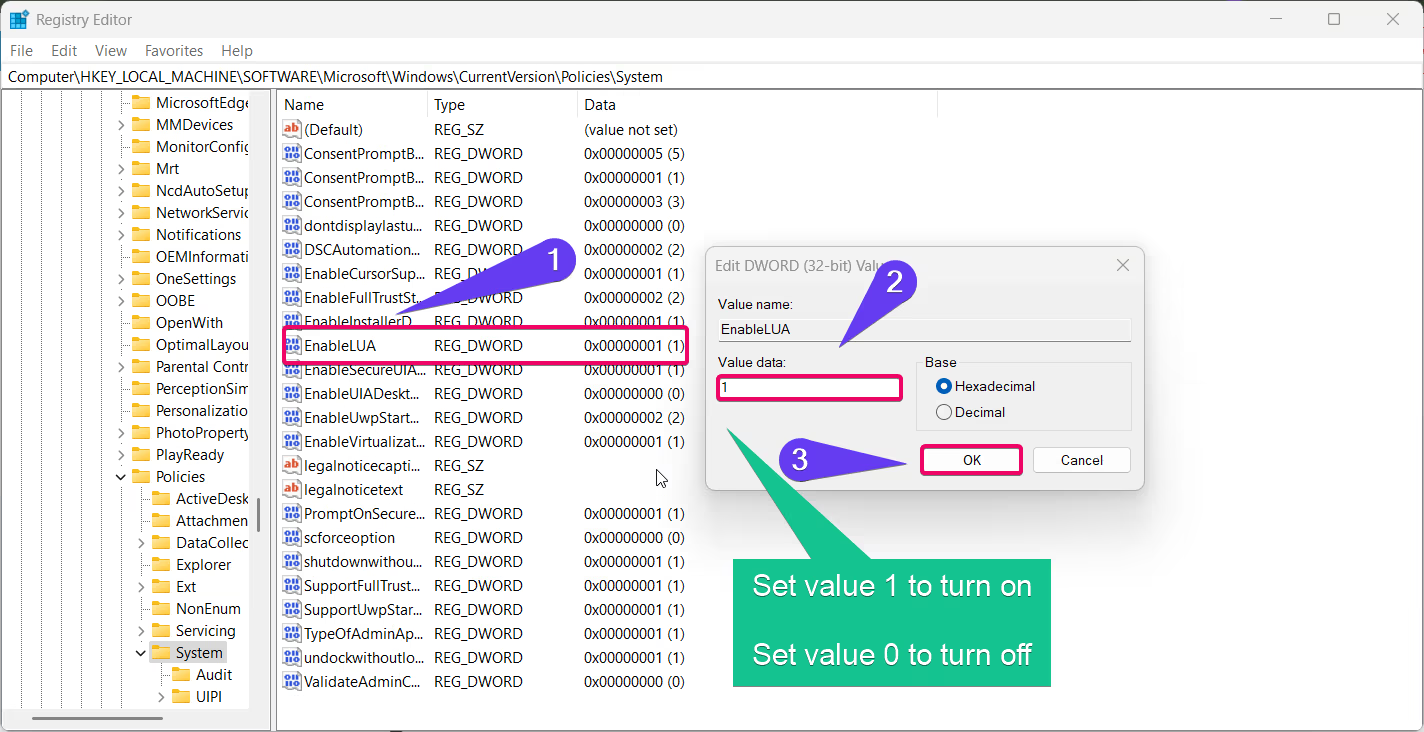
- Set the value to:
1to enable Admin Approval Mode.0to disable it.
- Close the Registry Editor and restart your computer for the changes to take effect.
Method 4: Using PowerShell
For users comfortable with command-line tools, PowerShell offers a quick way to enable or disable Admin Approval Mode:
- Open PowerShell as Administrator by right-clicking the Start button and selecting Windows Terminal (Admin).
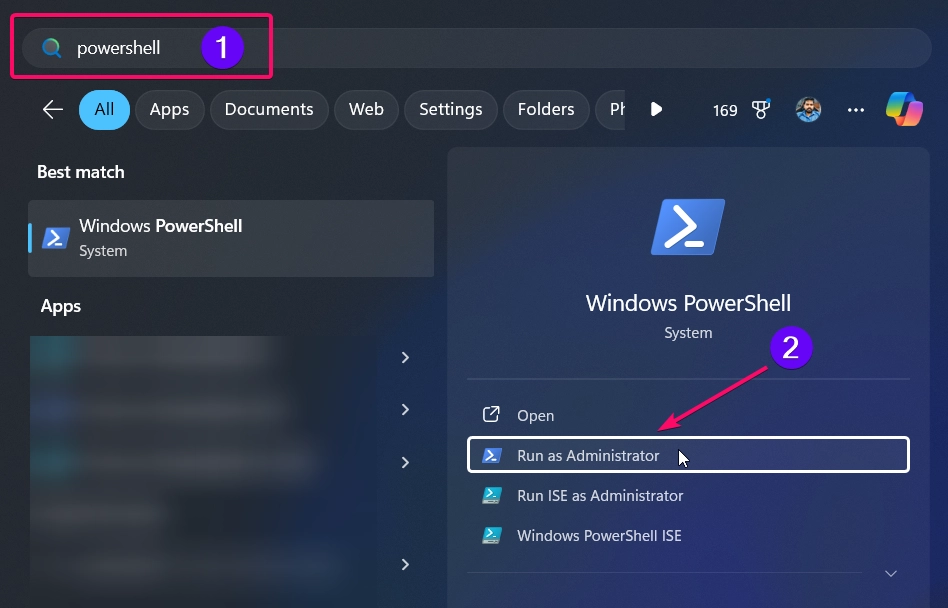
- To enable Admin Approval Mode, enter the following command:
Set-ItemProperty -Path "HKLM:\SOFTWARE\Microsoft\Windows\CurrentVersion\Policies\System" -Name EnableLUA -Value 1

- To disable Admin Approval Mode, enter:
Set-ItemProperty -Path "HKLM:\SOFTWARE\Microsoft\Windows\CurrentVersion\Policies\System" -Name EnableLUA -Value 0

- Restart your computer to apply the changes.
Method 5: Using Command Prompt
You can also use the Command Prompt to enable or disable Admin Approval Mode:
- Open Command Prompt as Administrator by typing
cmdin the search bar, right-clicking it, and selecting Run as administrator.
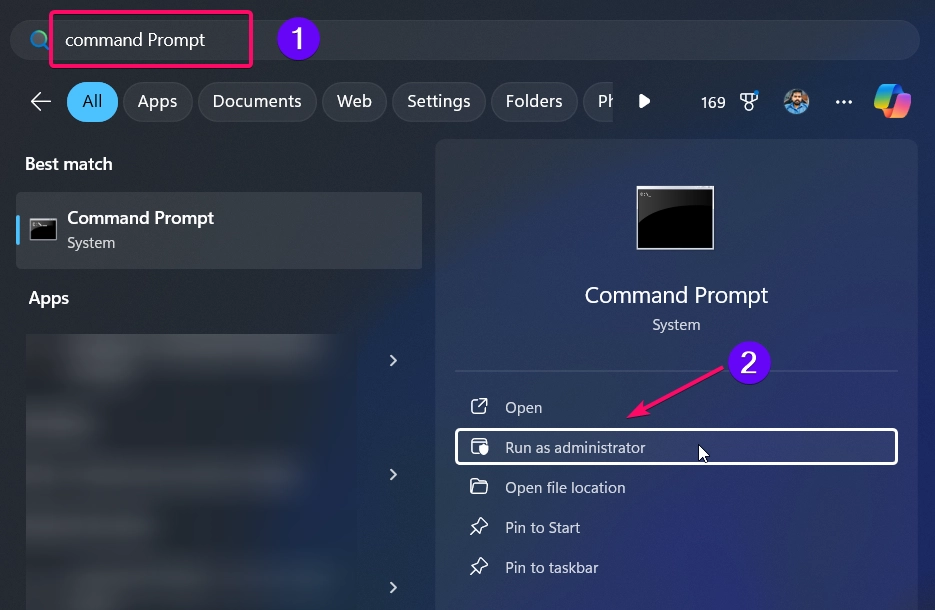
- To enable Admin Approval Mode, type:
reg add "HKLM\SOFTWARE\Microsoft\Windows\CurrentVersion\Policies\System" /v EnableLUA /t REG_DWORD /d 1 /f

- To disable Admin Approval Mode, type:
reg add "HKLM\SOFTWARE\Microsoft\Windows\CurrentVersion\Policies\System" /v EnableLUA /t REG_DWORD /d 0 /f

- Restart your system for the changes to take effect.
Conclusion
Admin Approval Mode in Windows 11 provides an extra layer of security for administrator accounts, ensuring critical tasks are performed only with explicit consent. By following any of the methods above, you can easily enable or disable this feature based on your needs. From the Local Security Policy to PowerShell, each method is designed to offer flexibility and control over your system’s security settings.
Related: Enable/disable Built-in Administrator Account Lockout In Windows 11
FAQ:
What happens if I disable Admin Approval Mode?
Disabling this mode removes the extra layer of confirmation for administrative tasks, which may reduce security but streamline workflows in trusted environments.
Is Admin Approval Mode necessary for all users?
It is recommended for most users to enhance security, but in specific cases like controlled environments, disabling it might be acceptable.
Can I enable Admin Approval Mode for specific tasks?
No, Admin Approval Mode applies to all administrative tasks globally and cannot be customized for specific operations.
Related: Enable/disable The Built-in Administrator Account In Windows 11
Can I re-enable Admin Approval Mode after disabling it?
Yes, you can re-enable it anytime using any of the methods outlined above.
Does enabling Admin Approval Mode affect system performance?
No, enabling this feature does not impact system performance, as it only adds a confirmation step for administrative tasks.
Read More:
- How to Add/Remove Common Program Groups from Start Menu in Windows 11?
- How to Add/Remove Android Apps from Your Phone to Start on Windows 11 PC?
- How to Turn On/Off Airplane Mode in Windows 11?
